
How to use SAGLY.
Make your bike feel right.
Create your first setup, understand your Tuning Score, or find the next step for maintenance and training.
Screenshots sit beside the matching steps. Tap any image for a larger view.
On this pageChoose a topic
No matching topic. Try “setup”, “score” or “training”.
Jump straight to a topic. Your current section is highlighted as you read.
Find your way around SAGLY
Use the bottom navigation to move between the main areas of the app.
- Home: edit your profile, create a setup or open Explore Setups.
- Setups: view and edit your bike settings, open Tuning Score, check maintenance and review History.
- WSIDO: open the “What should I do when…?” troubleshooting guide.
- Know How: learn what suspension terms and settings mean.
- Training: practise riding skills or follow a workout.
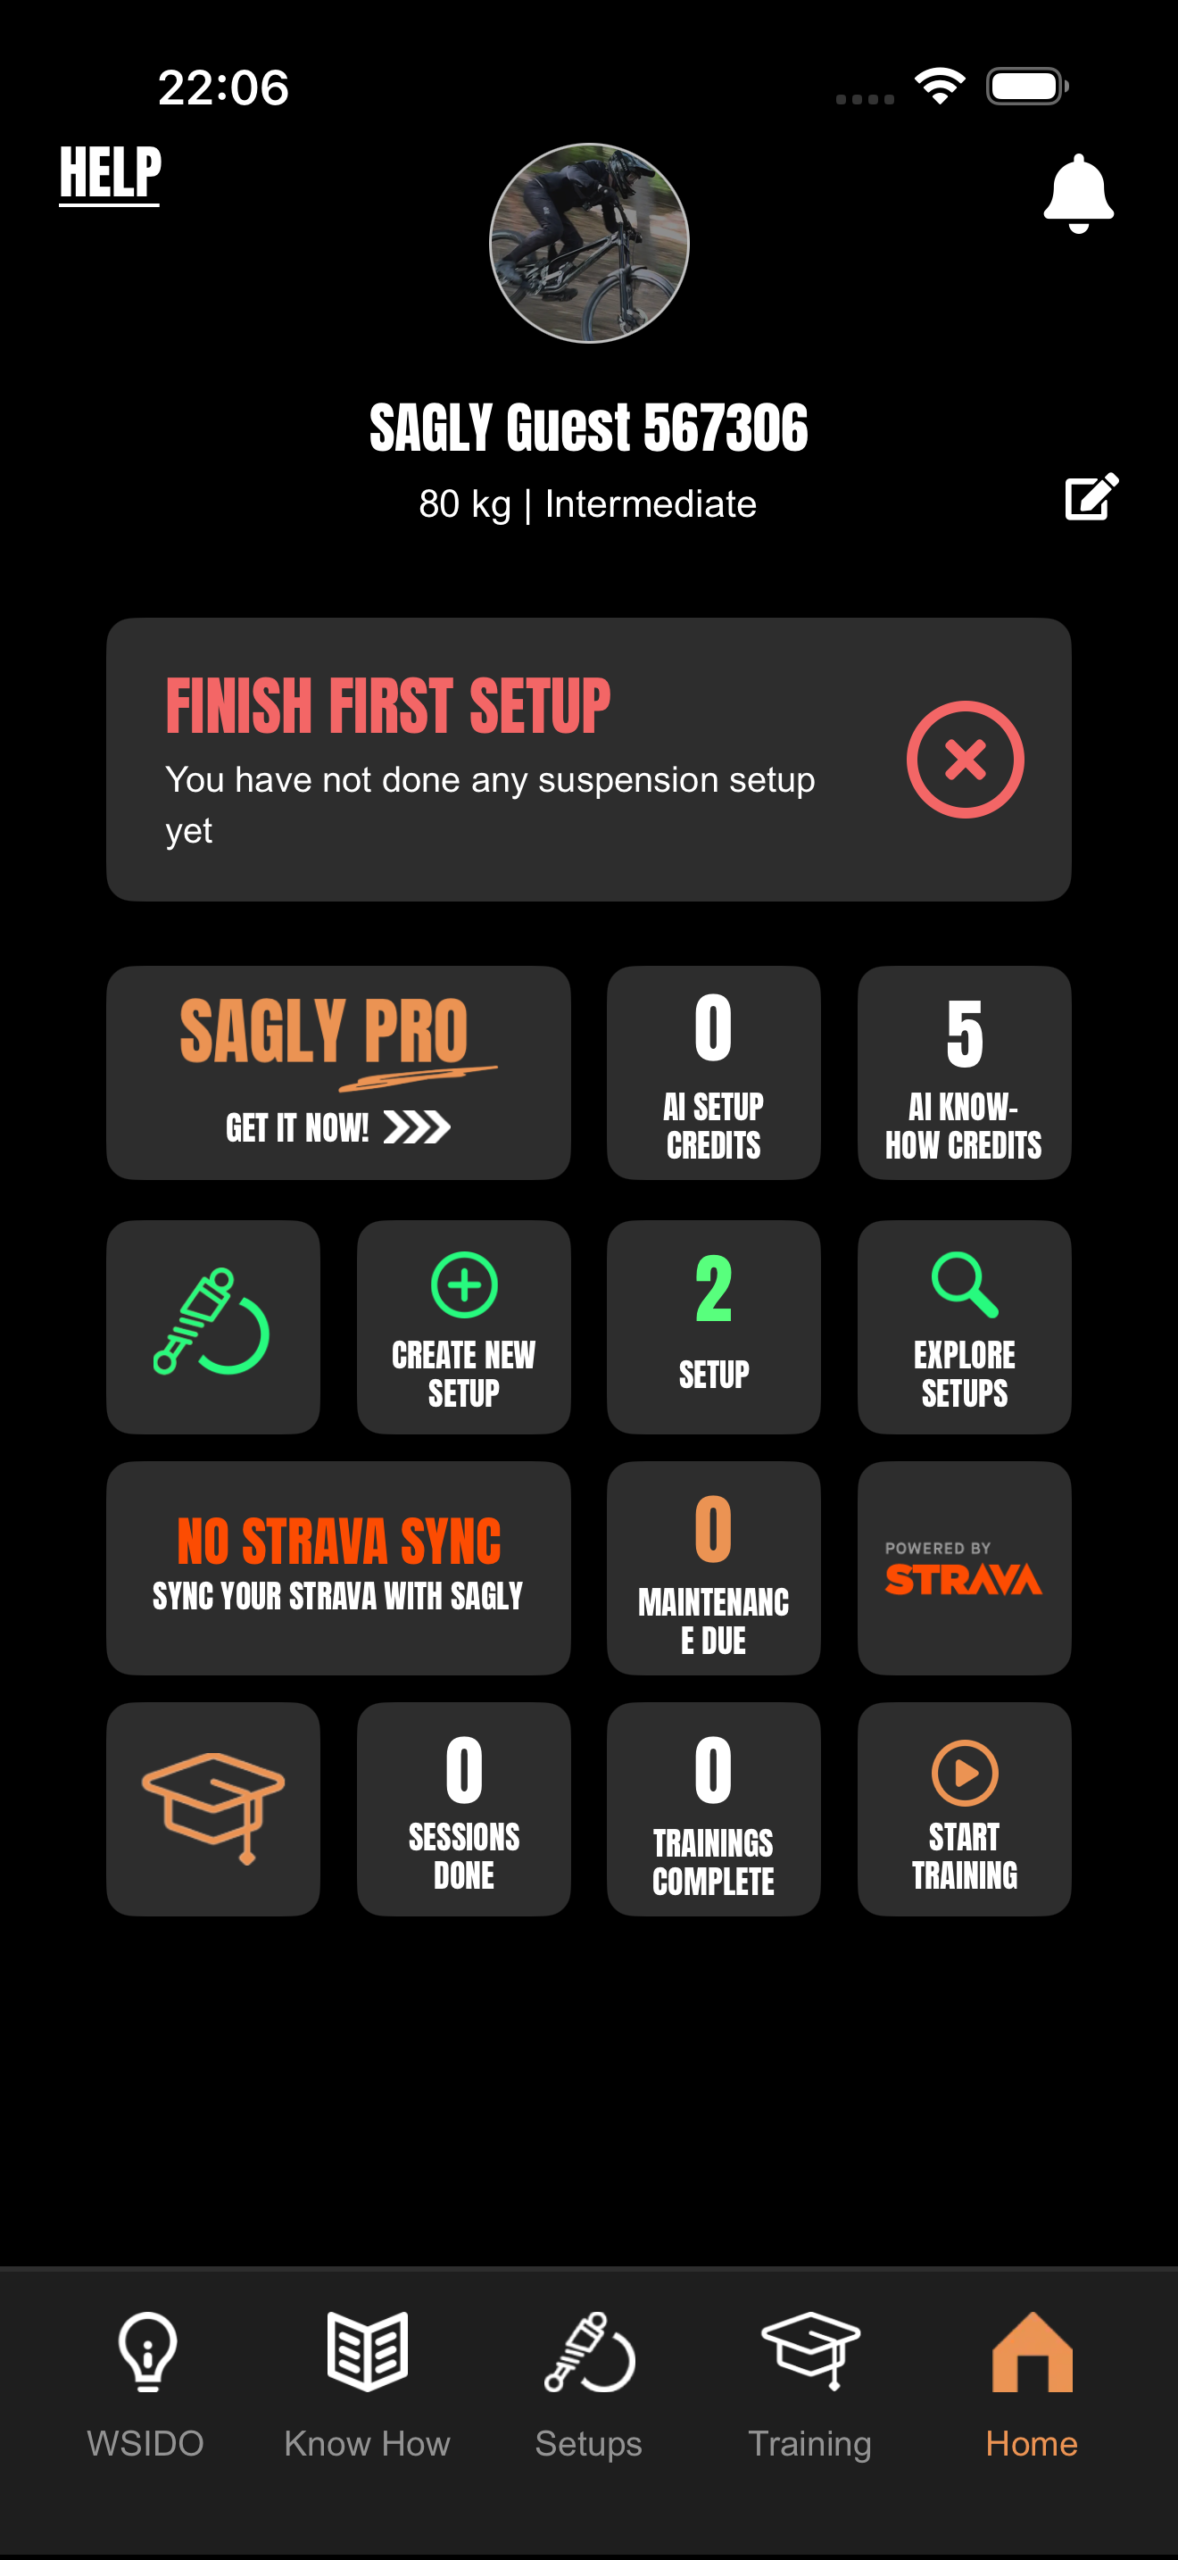
New to SAGLY? Start with your profile, create one setup, then use Tuning Score to work through your next adjustments. Already have a setup? Jump straight to the feature you need using this guide’s contents.
Add your rider profile
Your rider details help SAGLY tailor its starting suggestions.
See the profile pencil on Home ↑
- Open Home and tap the pencil to the right of your rider details.
- Choose your measurement system: metric uses kilograms and centimetres; imperial uses pounds and inches.
- Enter your height and body weight without riding gear, and choose your riding experience.
- Choose bar or PSI for tire pressure. Save your profile.
You can also connect Strava from your profile. This supports ride imports, maintenance tracking and the ride checks used by Tuning Score.
Create a setup and identify your bike
Open Home → Create New Setup, then choose how you want to begin.
- LAZY: get a roughly configured starting setup with fewer manual steps.
- ADVANCED: enter settings you already use, or work through the setup guides yourself.
- Add a bike name, riding location and terrain. A bike photo makes different setups easier to recognise.
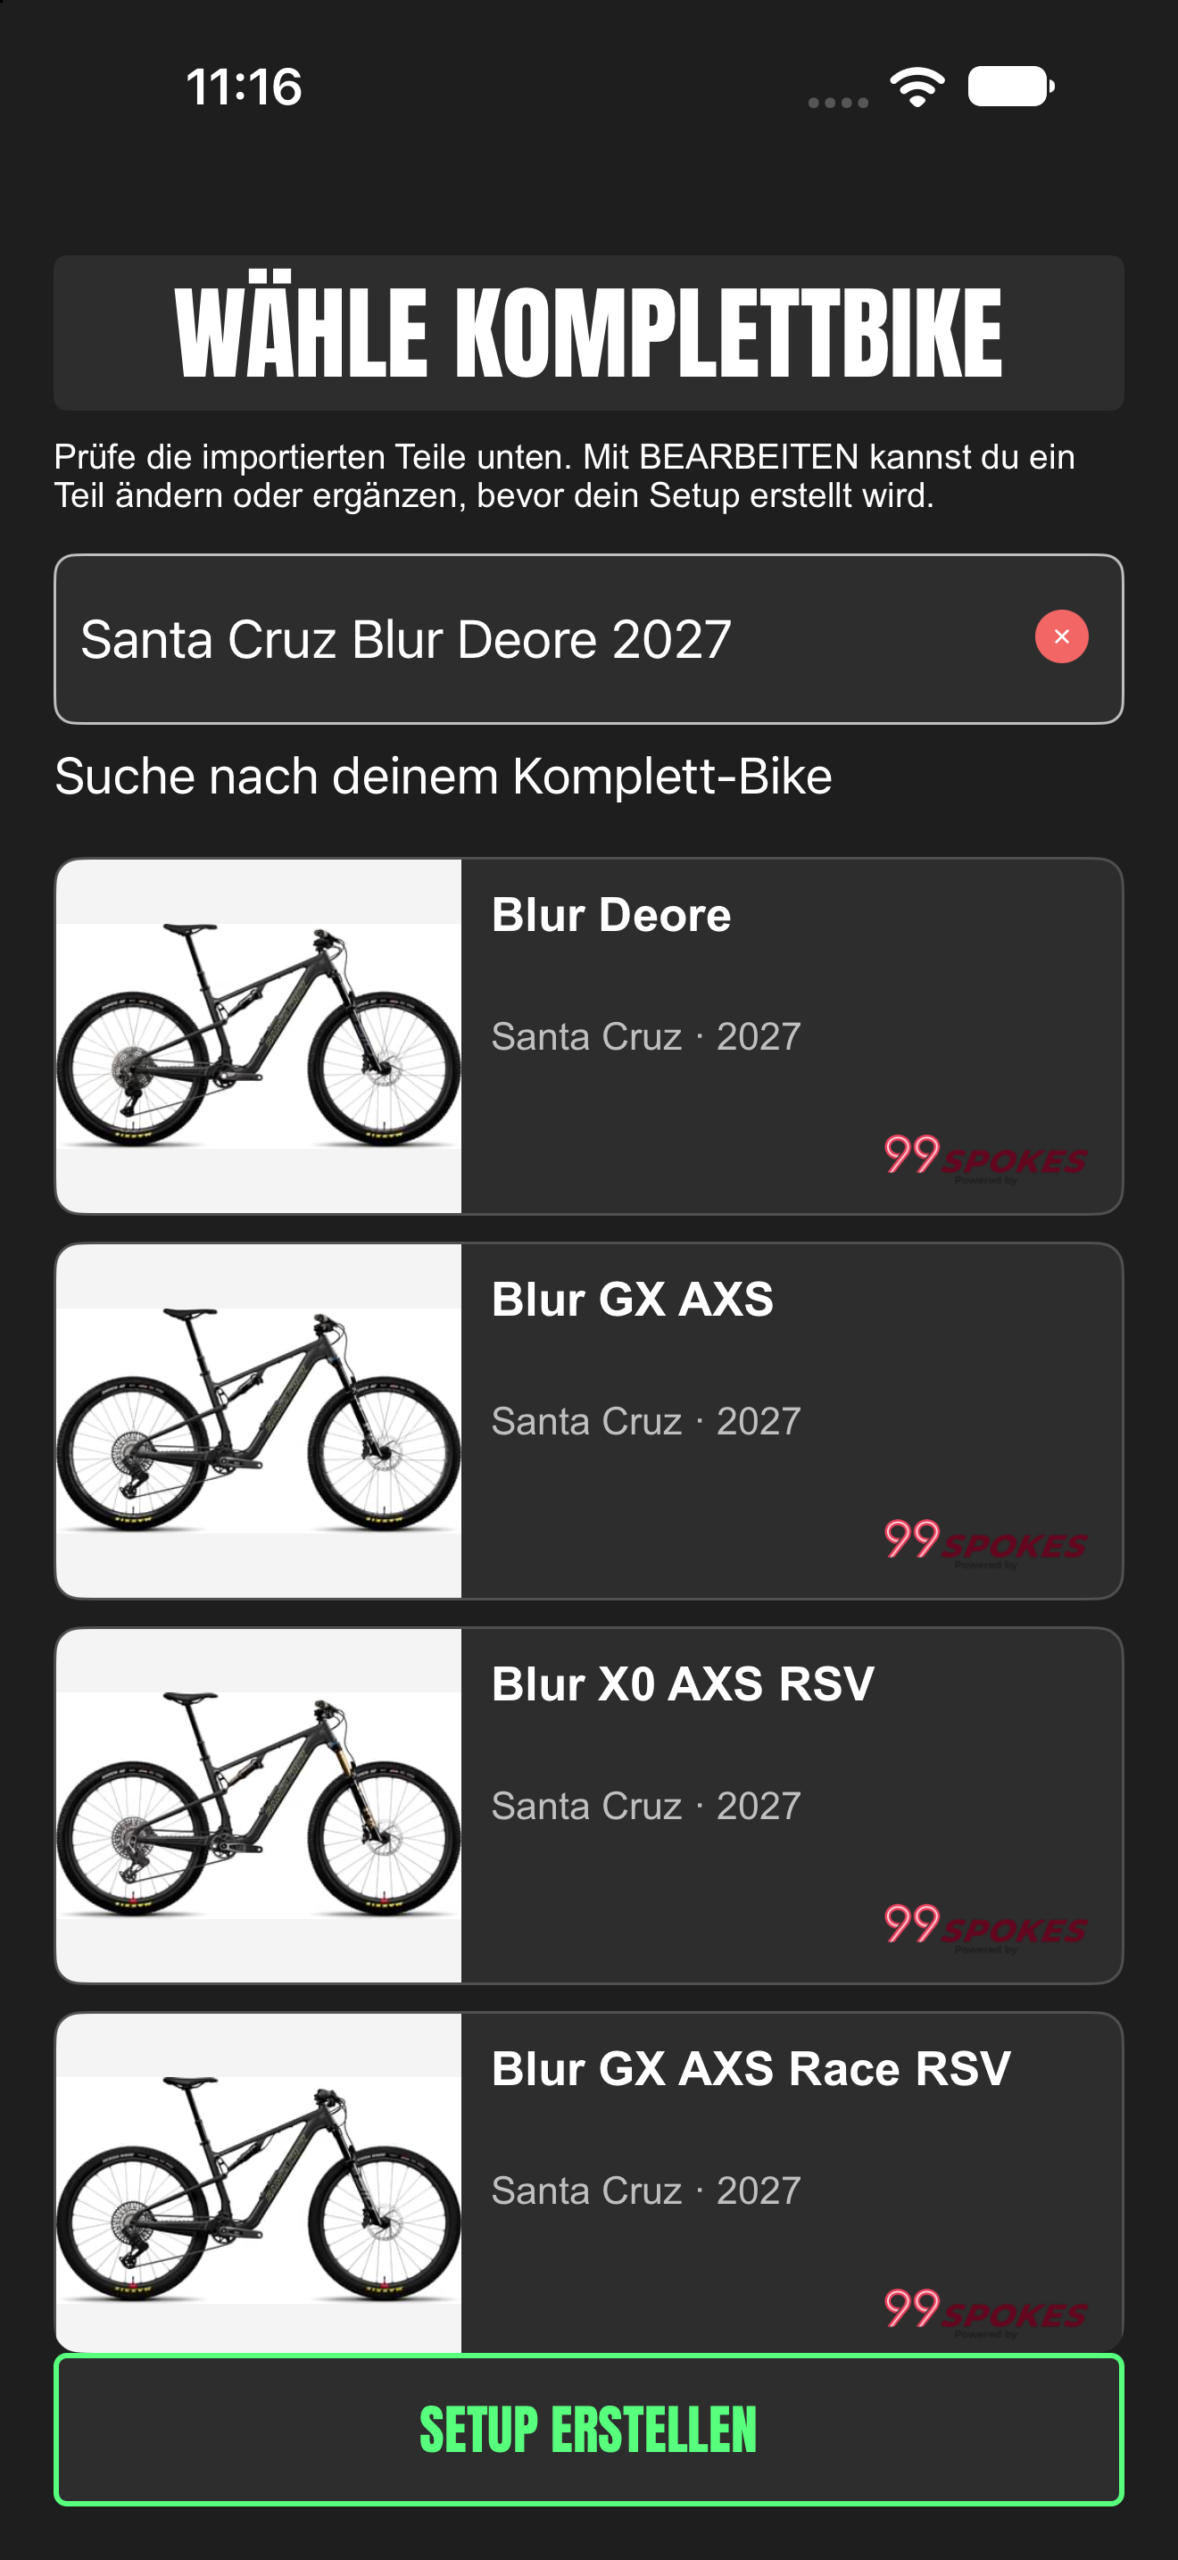
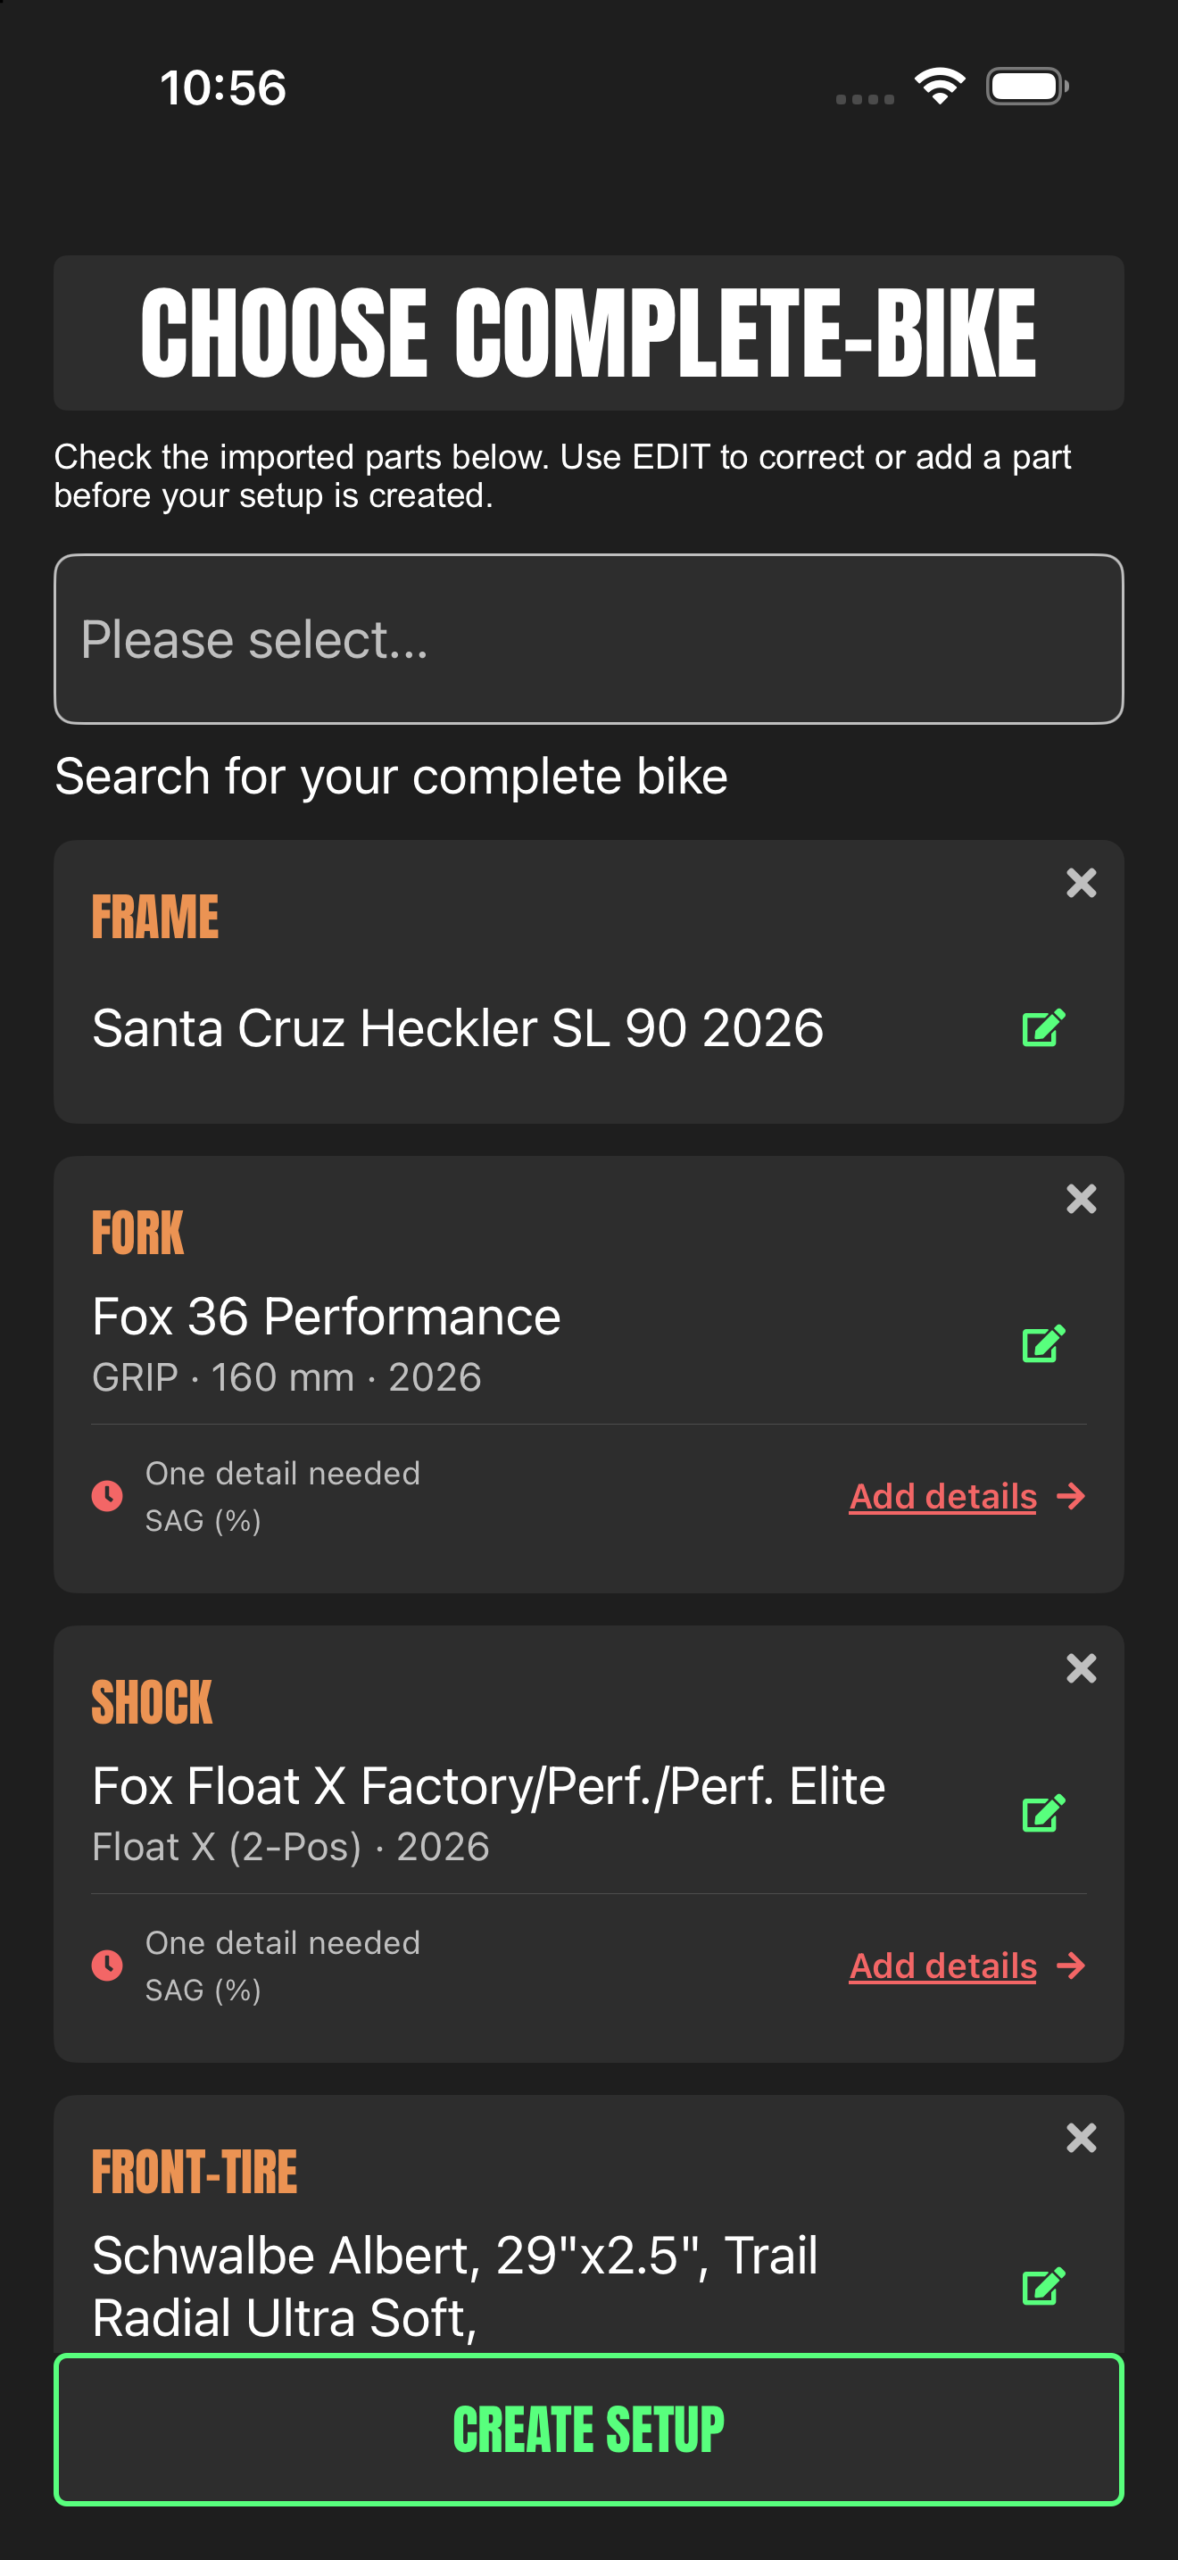
- Choose your parts individually, or select COMPLETE-BIKE to import the bike specification.
- Review the imported parts against the components actually fitted to your bike. Confirm the fork and shock model, component year and exact variant. Add fork travel and shock stroke where requested.
- Continue through the settings and finish the setup. It will appear in Setups.
A bike’s model year does not always match its suspension’s model year. Check upgrades and replacement parts too. Exact component details help SAGLY select the relevant setup data.
If you cannot identify a part yet, use THIS PART LATER where offered. Finish the rest, then use Add details or review the part from Setups. Free-text models can record your hardware, but may not support an exact model-based setup.
Build your starting setup
Start from your existing settings, or use a guide to establish a baseline for your tires, fork and shock.
Choose the guide that fits your starting point
- Tires: use the AIR PRESSURE CALCULATOR, then check the result on your own tires and terrain.
- Fork and shock: EASY SETUP GUIDE offers the SAG method, SAGLY AI- & FACTORY-SETUP, and practical rebound/compression tests.
- Already have settings? Record them manually so you have a reference before changing anything.
For AI and factory setup, confirm the exact component and provide any requested bike or rider details. Some results need more information or a hardware/OEM tune check. If manufacturer data is limited, SAGLY may leave settings unavailable; you can record them manually instead.
Treat generated values as a starting point to check and test. Selecting AI setup does not mean that every displayed value comes directly from a manufacturer table.
Manage and edit your setups
Open Setups to see the values saved for your bike. Swipe between setups or use the arrows.
- IN USE marks the setup currently fitted to your bike.
- QUICK EDIT lets you adjust saved setting values directly in the setup view. Finish editing when you are done.
- The options menu includes Edit Fork, Edit Shock, Edit Tires, Edit Parts, Edit All, Copy and maintenance options.
- NOTES is useful for trail conditions, tire changes or something you want to test next.
- RAIN/WET shows suggestions for wet conditions.
- SHARE SETUP opens sharing options.
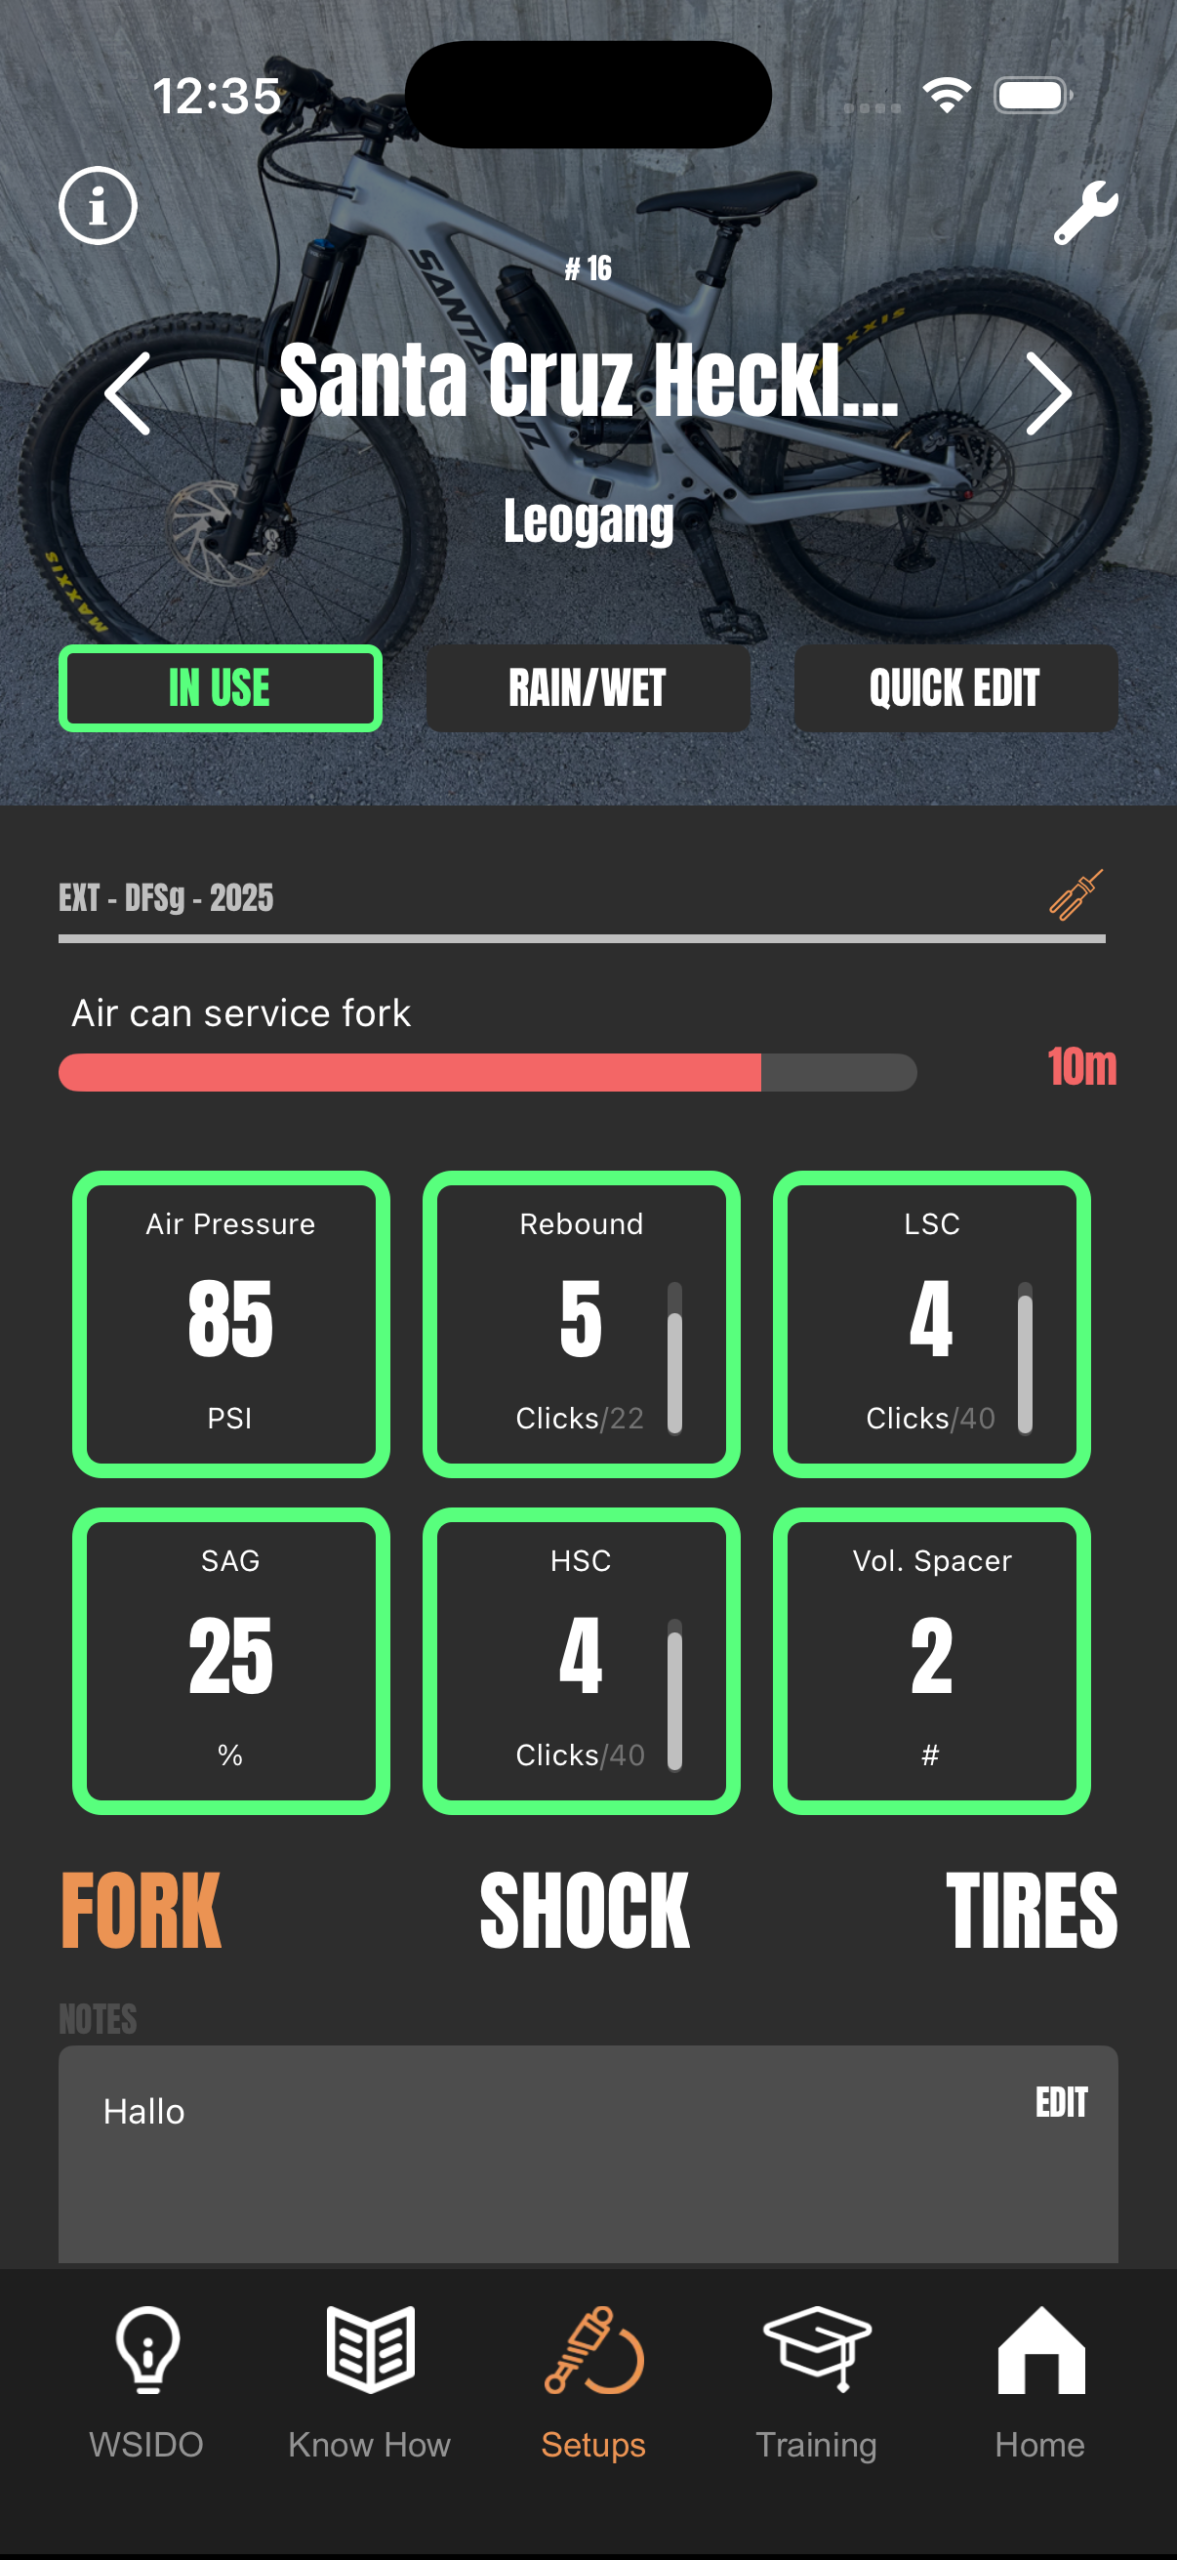
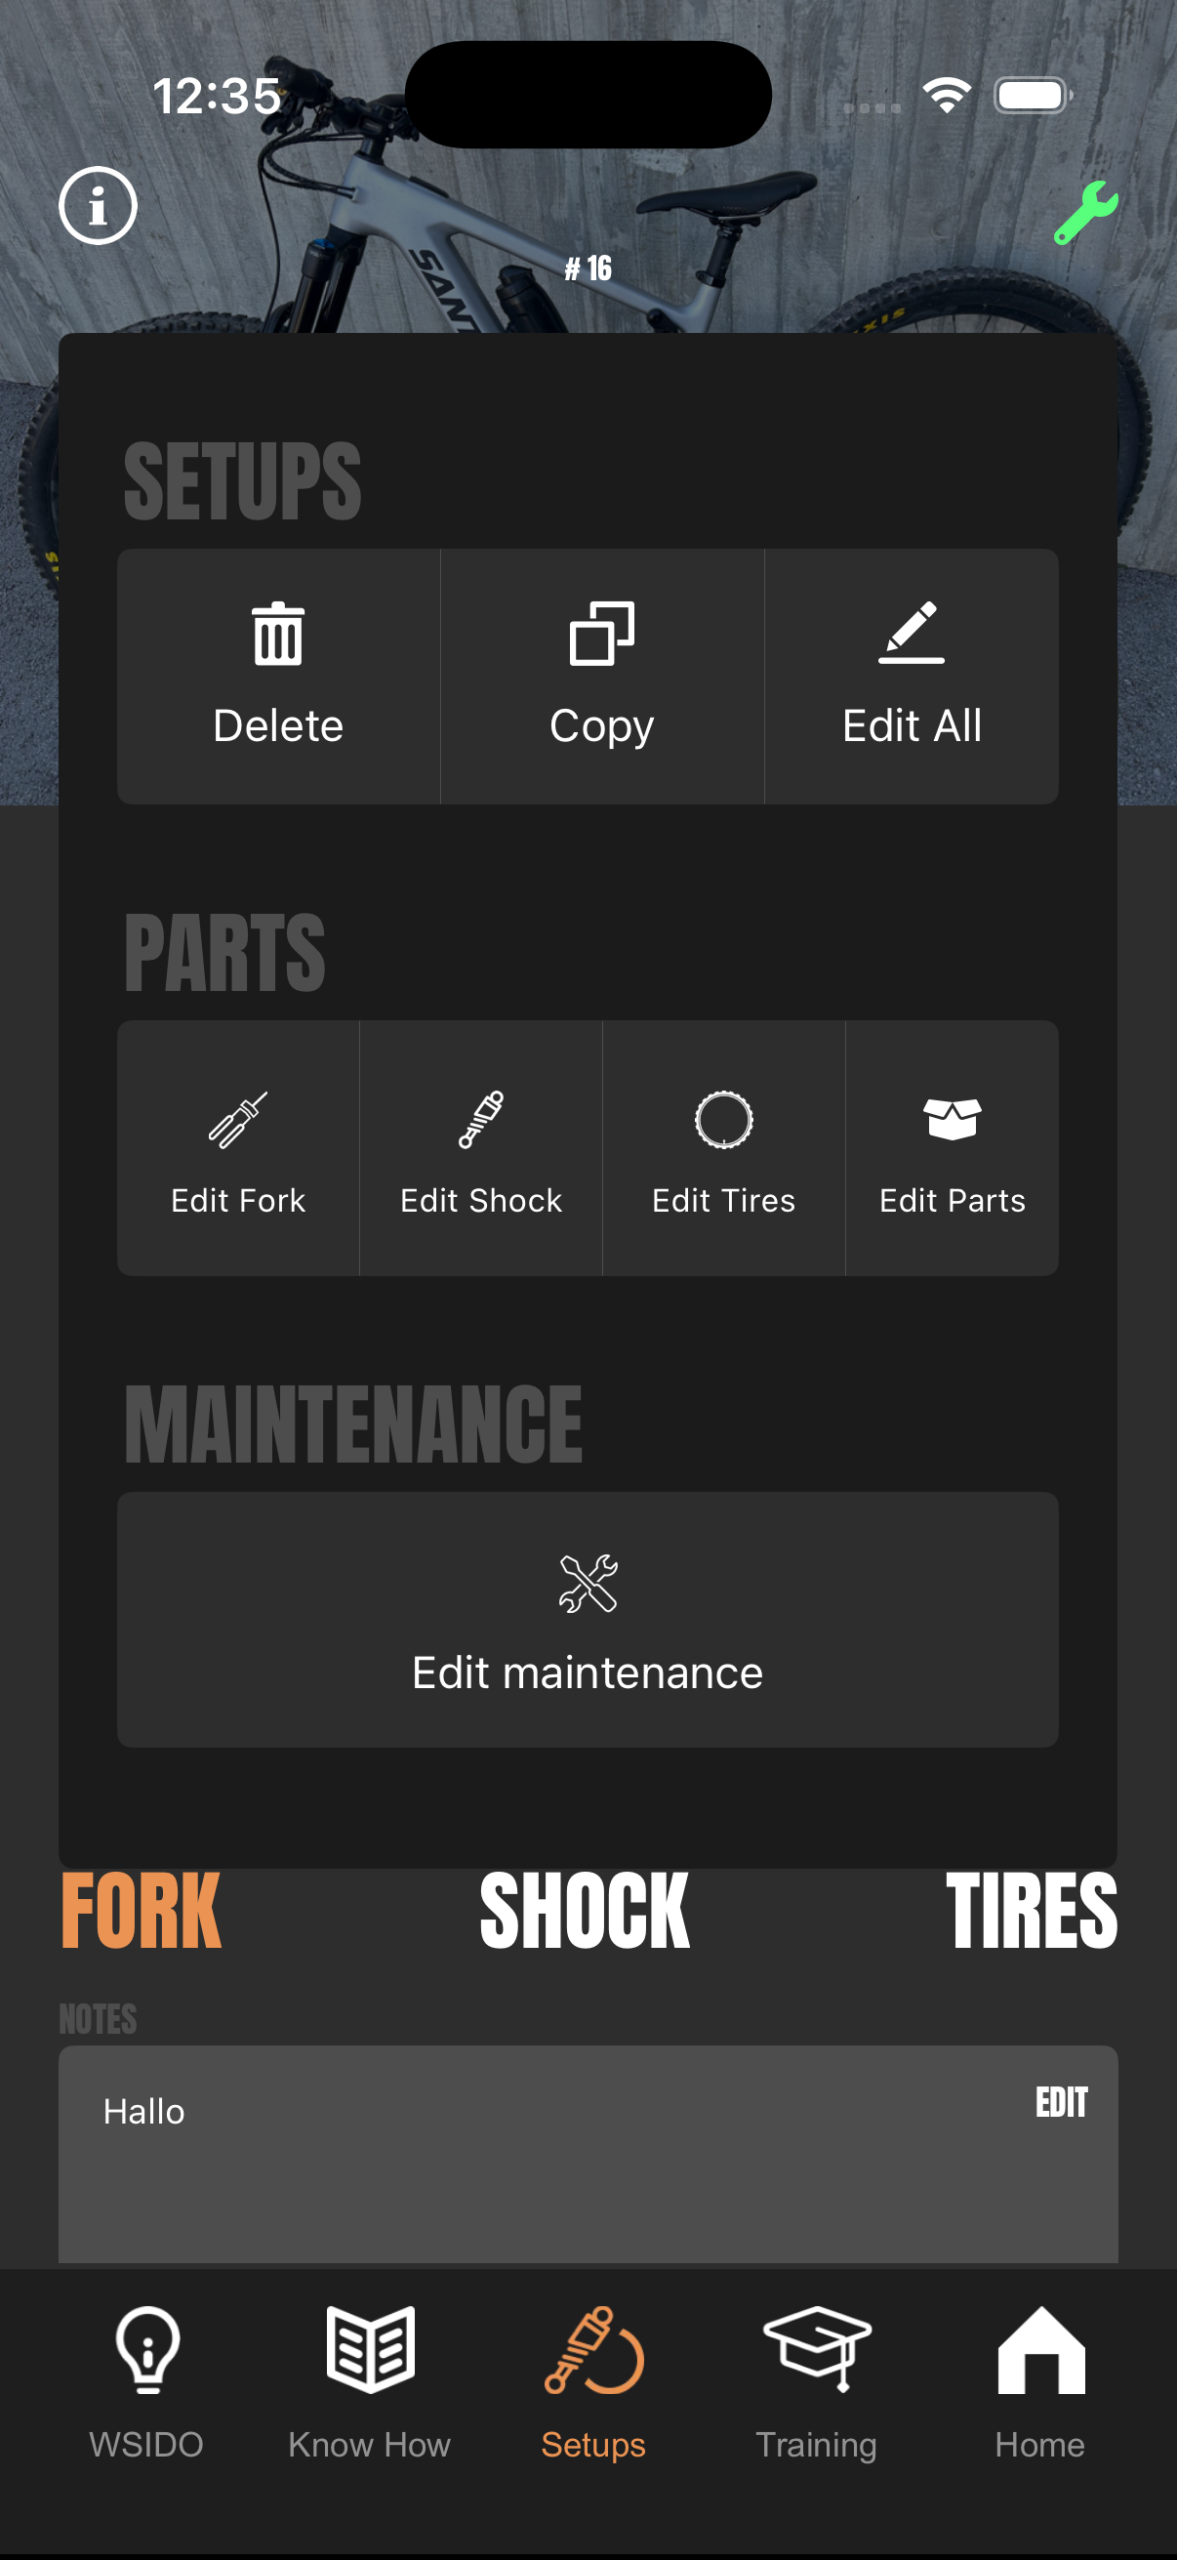
Copy a setup before trying a different trail, race or tire combination if you want to keep your current reference. Give each copy a clear name.
Understand your Tuning Score
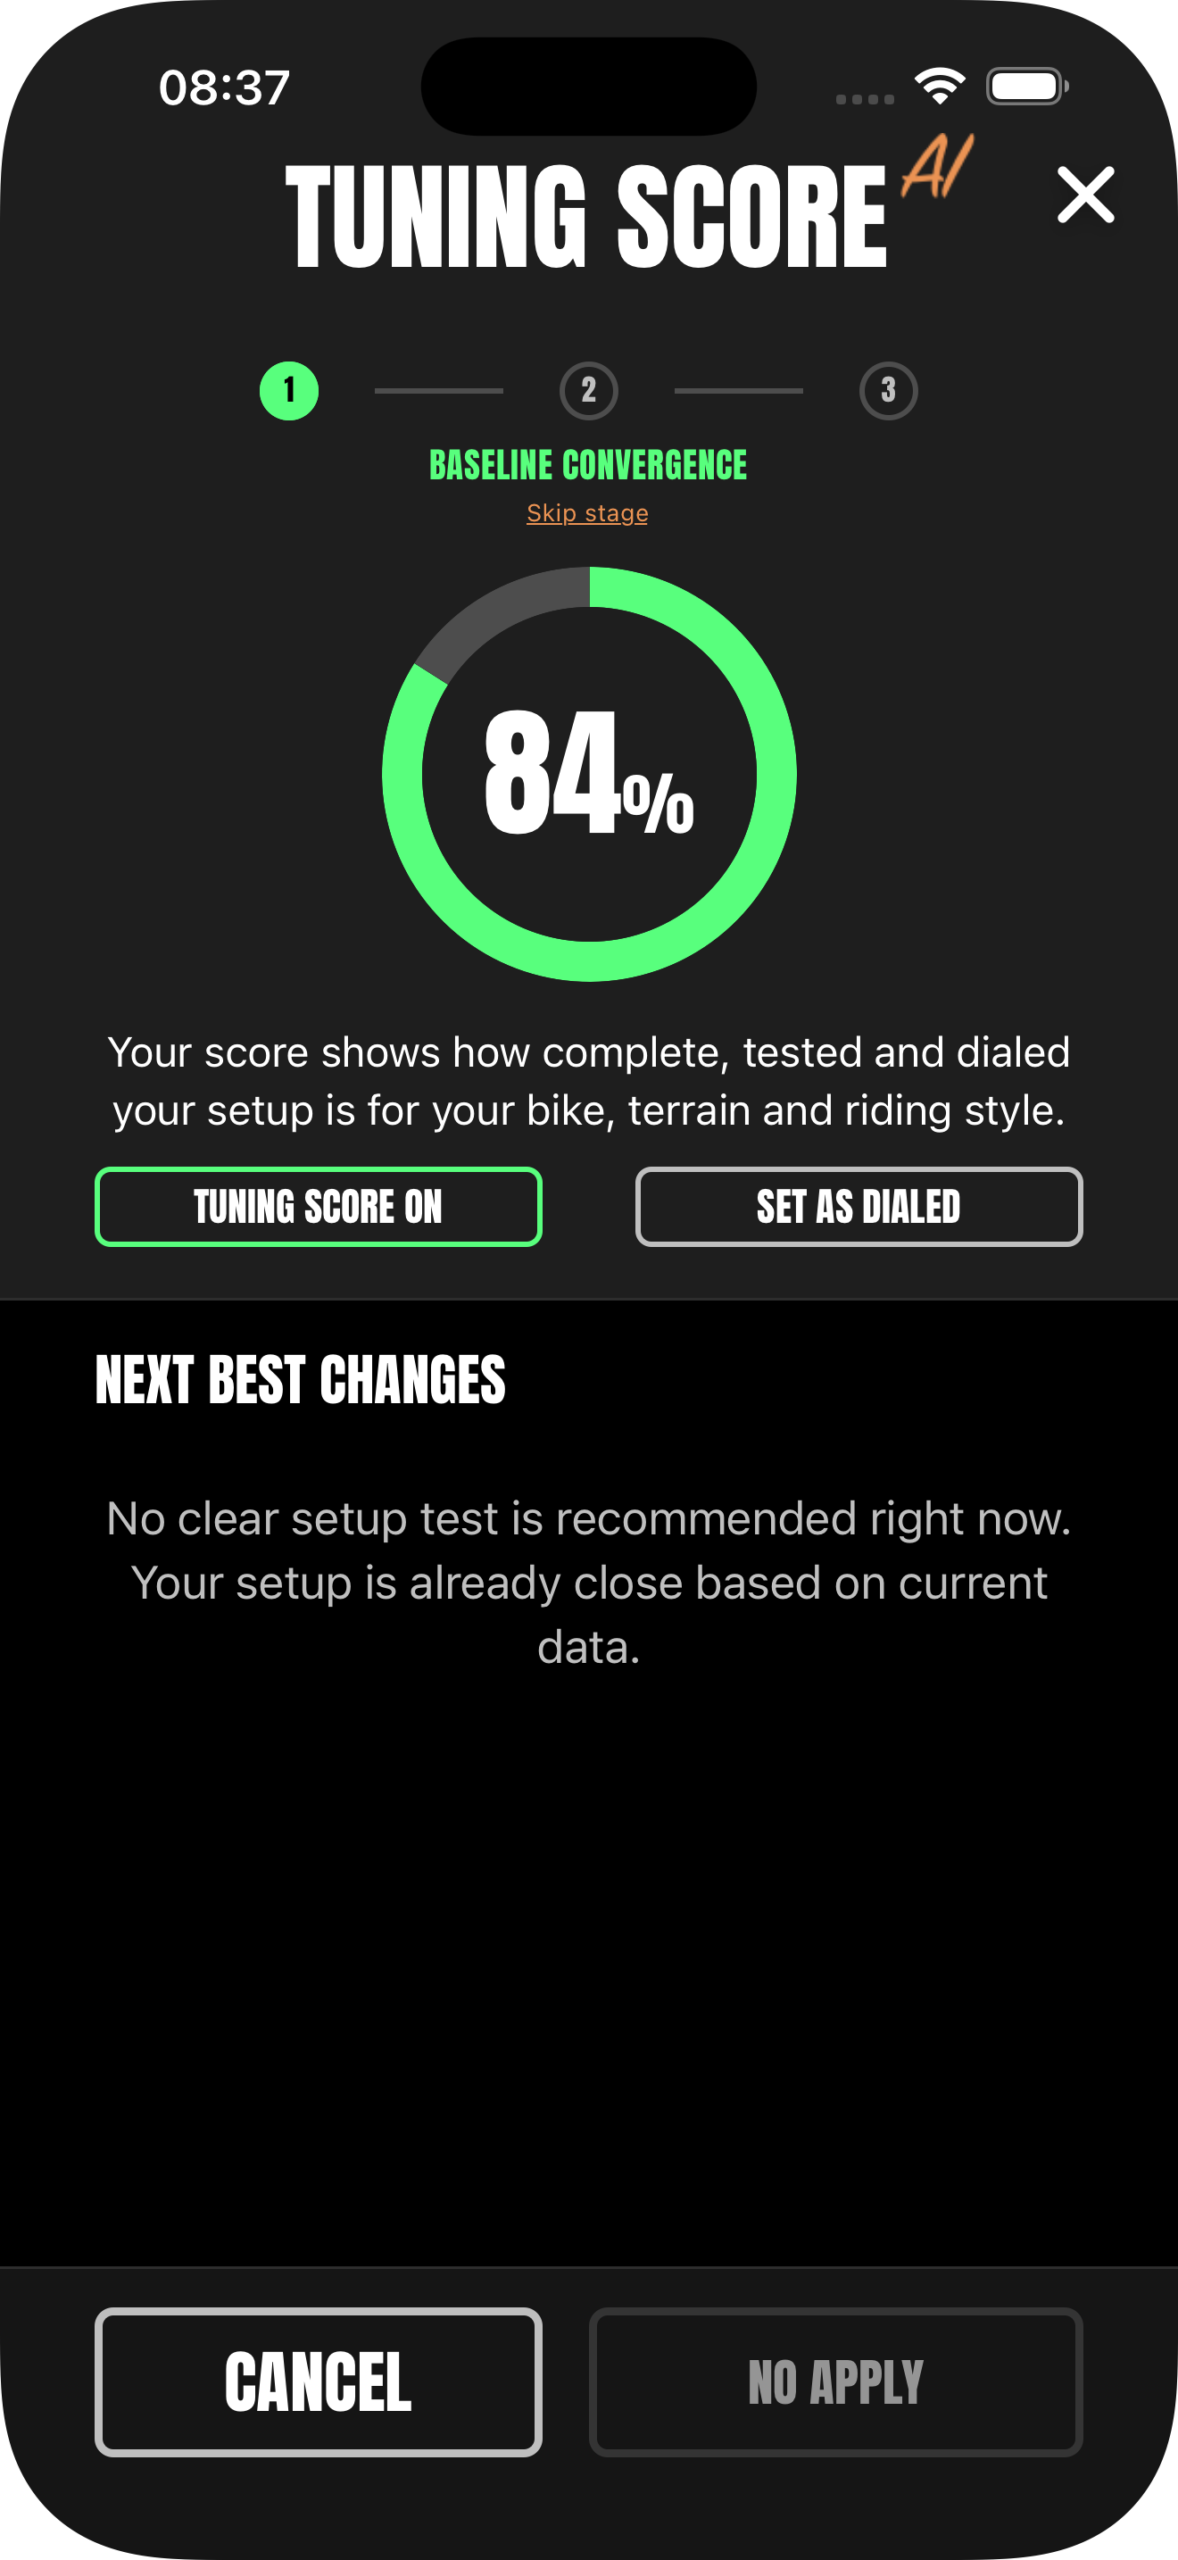
Tap the TUNING SCORE ring or pill above your setup to see your progress and next steps.
The percentage describes how complete, tested and dialed your setup is for your bike, terrain and riding style. Use it to guide your setup process; it is not a measurement of speed or a safety rating.
- BASELINE CONVERGENCEmove toward a model-specific starting point. Some suspension changes are linked and may update more than one setting together.
- CHECKLIST PERSONALIZATIONwork through five riding-feel checks to refine how your bike behaves.
- AI RECOMMENDATIONSconsider further adjustments using your setup details and previous testing.
If the setup is incomplete, use the pencil beside a missing field or tap COMPLETE SETUP. Exact suspension identity, travel, SAG and other requested context can be needed before baseline suggestions are available.
NEXT BEST CHANGES shows the proposed component and adjustment. Later-stage recommendations can also explain “Why this should help.” Availability depends on your setup data and app access; recommendations may require PRO or PRO+.
You can turn Tuning Score off for a setup or choose SET AS DIALED if you are happy with it. Tap SAVE to keep these preferences. SET AS DIALED is your own declaration; use REVERT DIALED to resume suggestions. Skipping a stage does not mark it as mastered and can reduce confidence.
Apply a change, ride and give feedback
A useful comparison starts with a clear change and a real ride.
- Open a recommendation and read the exact changes. Tap APPLY to save the proposed test in SAGLY.
- Make those changes on your bike. Keep unrelated settings unchanged while the test is active.
- Ride the new setup. With Strava connected, the activity must start after the change was applied and use the bike assigned to the test.
- Return to SAGLY to continue. Baseline ride checks unlock the next baseline step or checklist; later tests ask how the setup felt.
For a comparison, choose Much better, Slightly better, About the same or Worse. Choose “I haven’t tested yet” when you still need to ride. Honest feedback makes the next step more useful.
New recommendations pause while a test is active. Finish or skip that test before starting another, including on a different setup. Outside the linked baseline changes, test one controlled adjustment at a time.
Using SAGLY without Strava
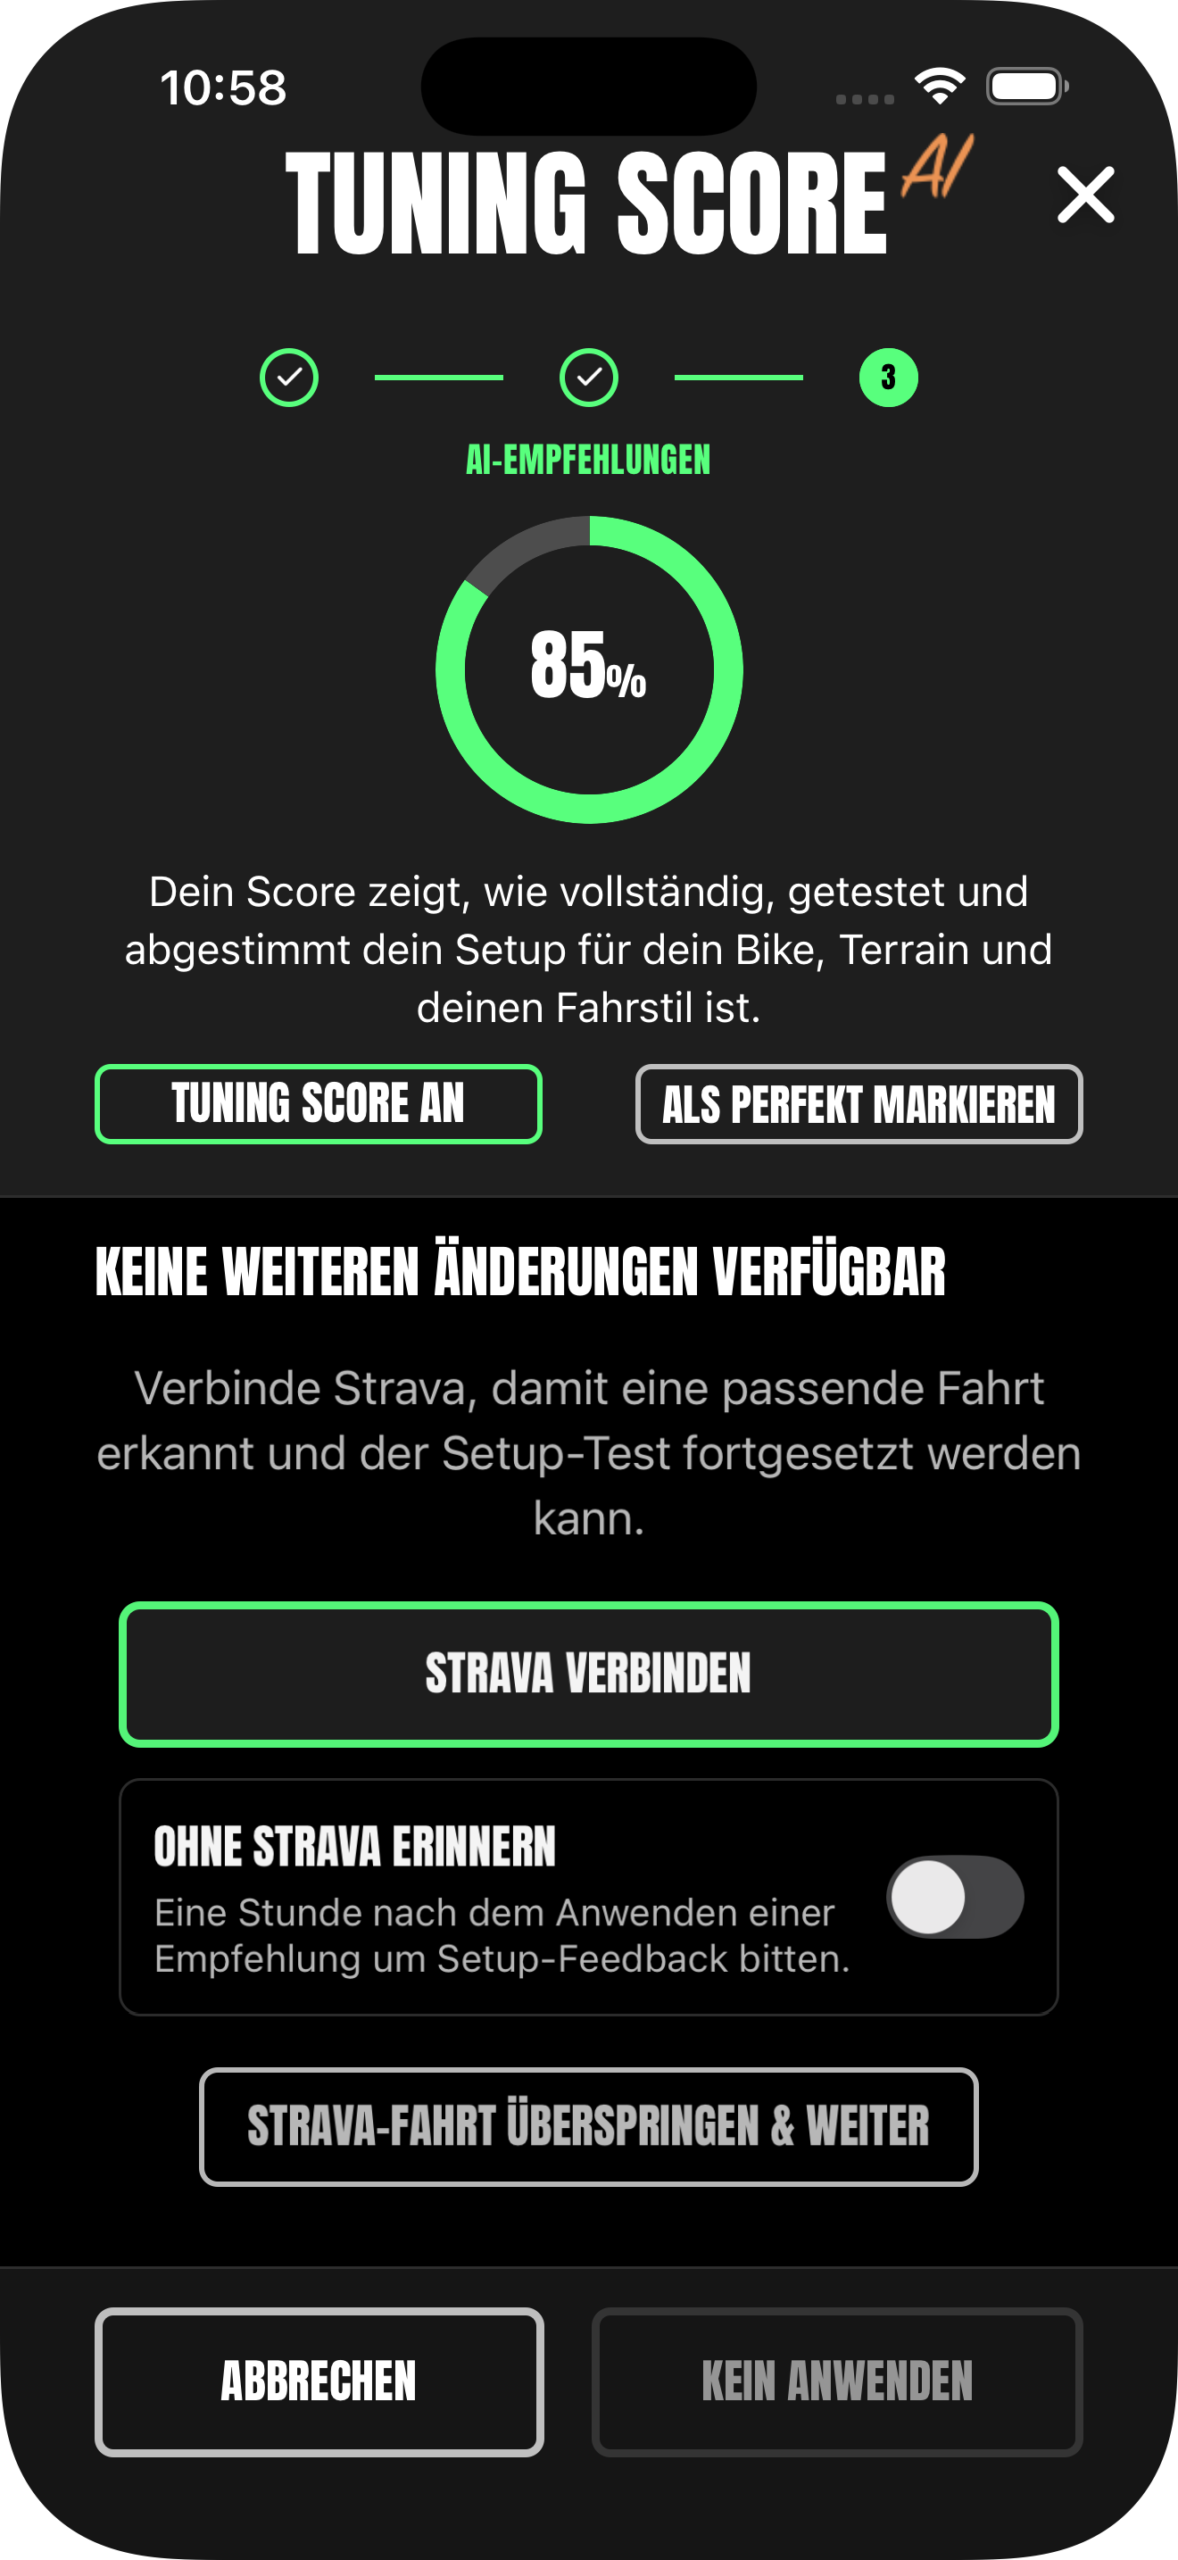
Choose REMIND ME WITHOUT STRAVA to request a feedback notification one hour after applying a recommendation. This is an optional reminder, not proof that a ride took place. Give feedback after testing the bike.
For a specific problem on the trail, open WSIDO, choose the symptom and review its suggested solutions. Apply one suitable solution, change the bike and test it before adding another adjustment.
Use History to learn from your changes
Scroll to HISTORY in your setup to see what changed and when.
Setting changes show the previous and new values with a date and time. Your feedback sits alongside the tuning record, so you can connect an adjustment with how the bike felt.
Imported Strava rides and completed services can appear here too. Use the history filters to focus on tunes, feedback, rides or service records. Before another test, check the last change and add a note about the trail or conditions if that helps explain the result.
Track rides and maintenance with Strava
Connect Strava in your profile, then choose how each setup should use your rides.
See Edit maintenance in the tools menu ↑
- Create or edit the setup and choose MAINTENANCE & STRAVA RIDES, or STRAVA RIDES ONLY if you only want activities in History. You can also open Edit maintenance from the setup options.
- Select the Strava bikes that belong to this setup and choose the import starting date. No selected bikes means no ride import.
- For maintenance tracking, choose riding hours or mileage and enable the tasks and intervals you need. ADD DEFAULT INTERVALS provides a starting point; align intervals with your component manufacturer’s guidance.
- Review the progress bars in Setups. After carrying out a service, open that task and use RESET SERVICE to record it.
Only matching rides are imported when filtering by bike. Check the bike assigned to an activity in Strava if it is missing. Imported riding totals can make maintenance bars partly filled immediately after setup; check the starting date and your actual service history.
Learn the settings and explore other setups
Use Know How for explanations and Explore Setups for ideas from other riders.
See Explore Setups and Know How on Home ↑
Open Know How from the bottom navigation to understand terms and the effects of adjustments. The “What is…” explanations inside setup guides help when you need context without leaving the setting.
From Home, open EXPLORE SETUPS. Search or filter by frame, fork, shock or tire model and compare the rider and bike information. You can high-five a setup, comment or copy it to your own setups.
Use a copied setup as a reference to review, then adapt it to your own components, body weight and riding conditions. Matching a fork name alone does not make another rider’s settings a direct match for your bike.
Practise with Training and Video AI Check
Open Training and tap the plus button to choose how you want to practise.
- Create training plan: choose up to three goals and set the days and frequency that fit your week. Riding plans include weather preferences; workout plans include duration and at-home or gym choices where offered.
- Create training: work through a training without a calendar plan.
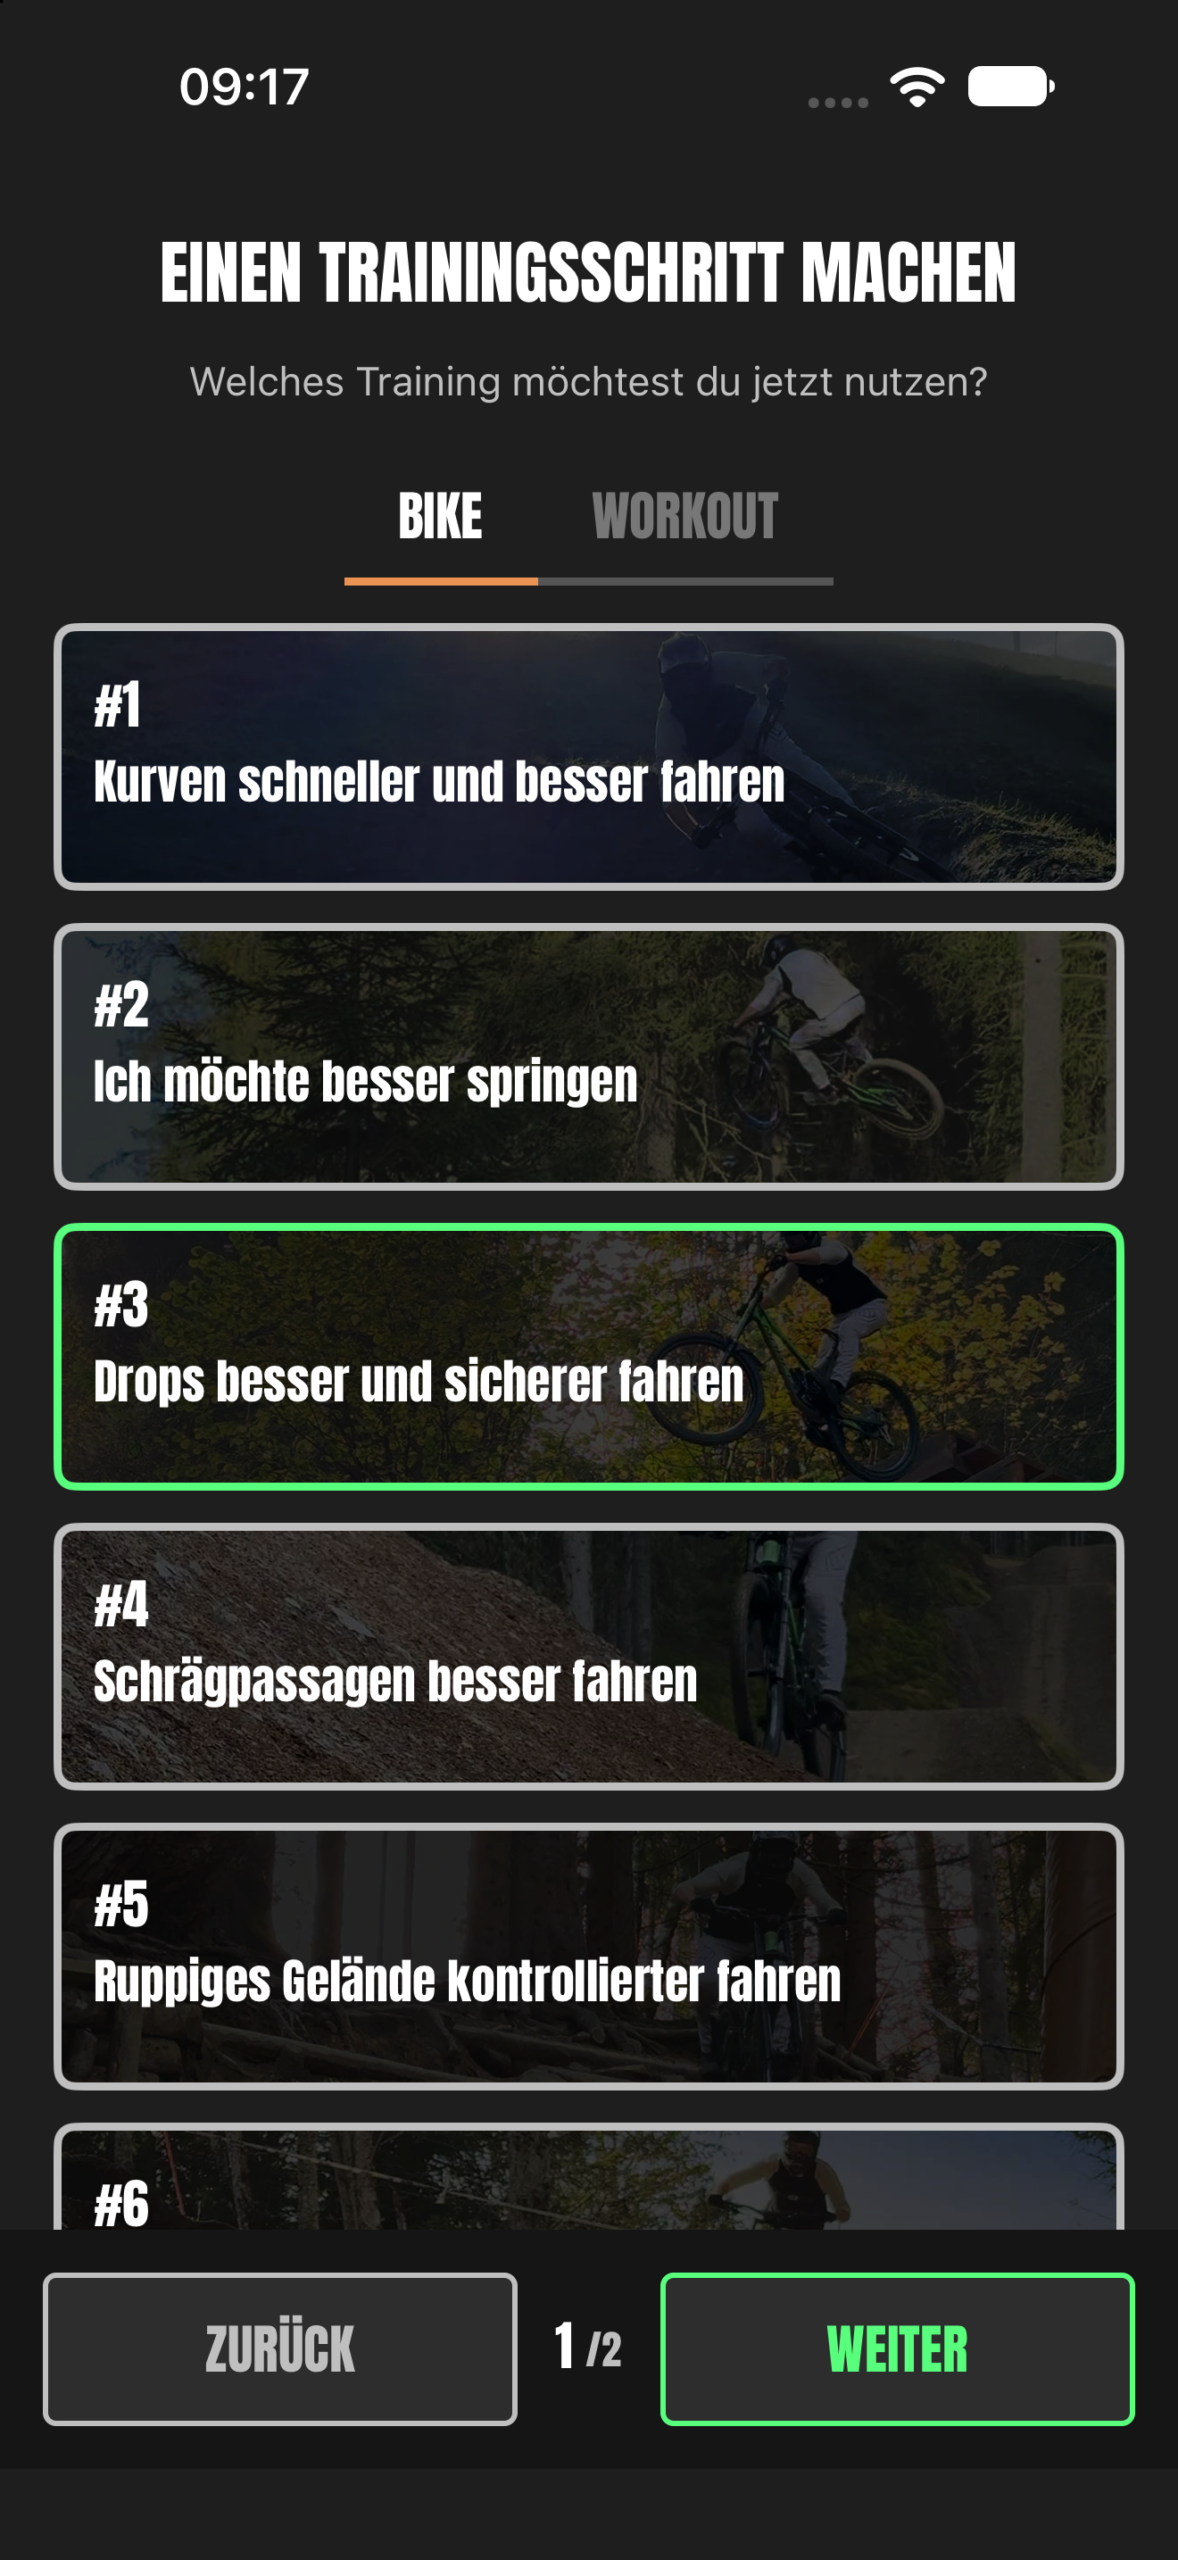
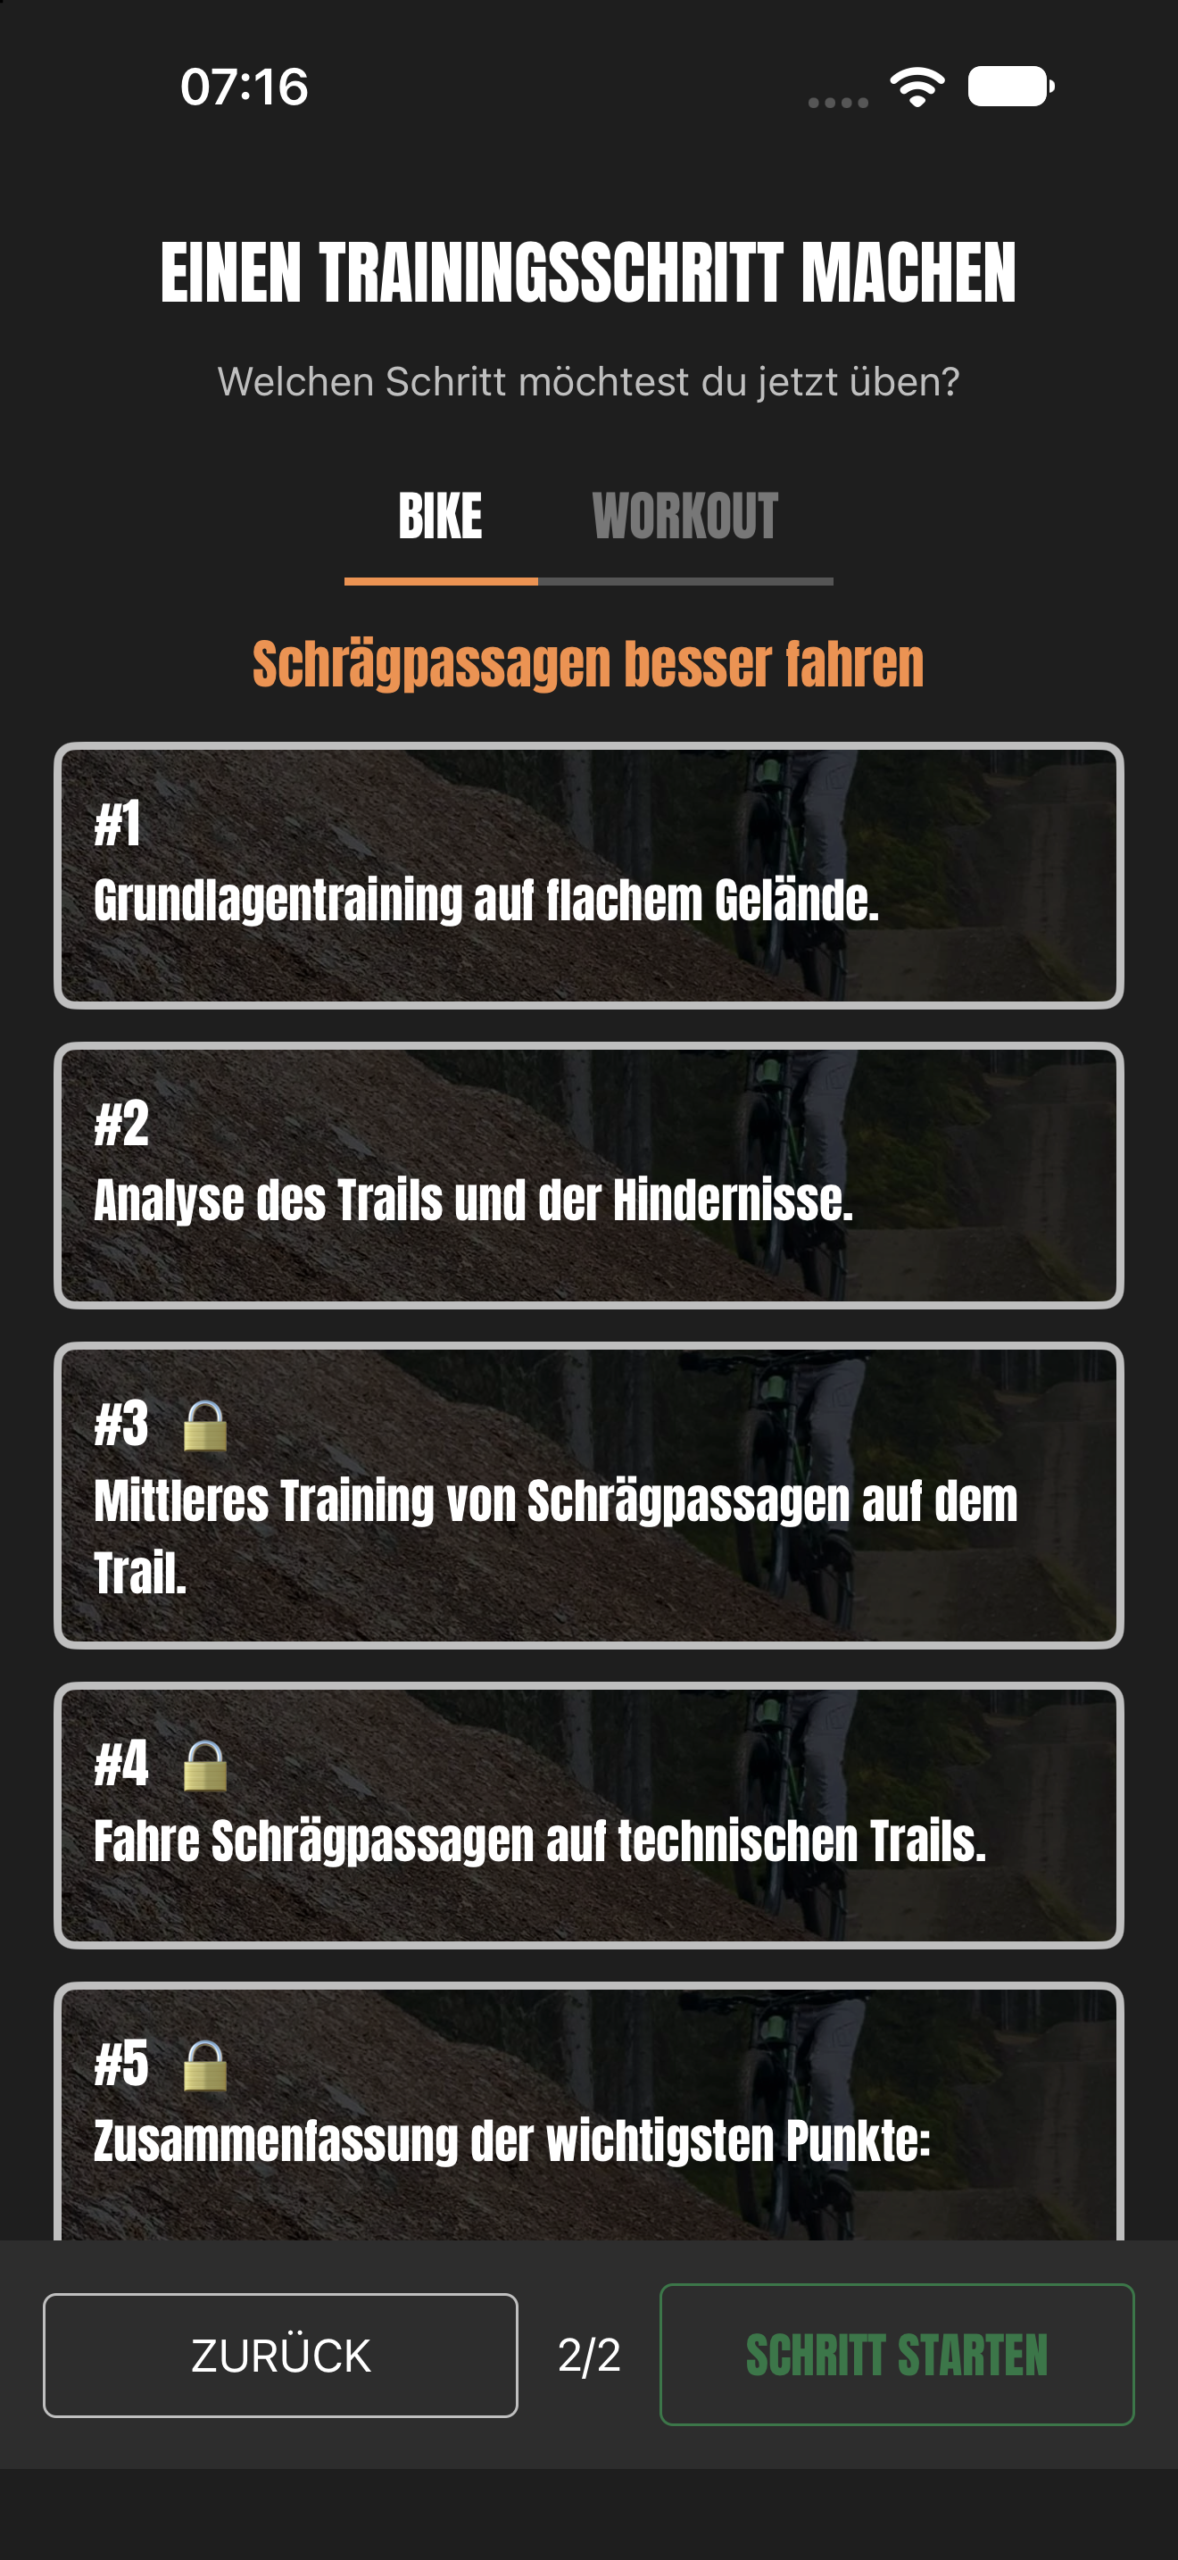
- Do a single training step: choose Riding or Workout, a training and the step you want to practise, then START STEP. This leaves your existing plan unchanged.
The calendar shows planned sessions. Today’s, upcoming and completed training areas help you find the next session or revisit previous work. Completed single steps have their own history.
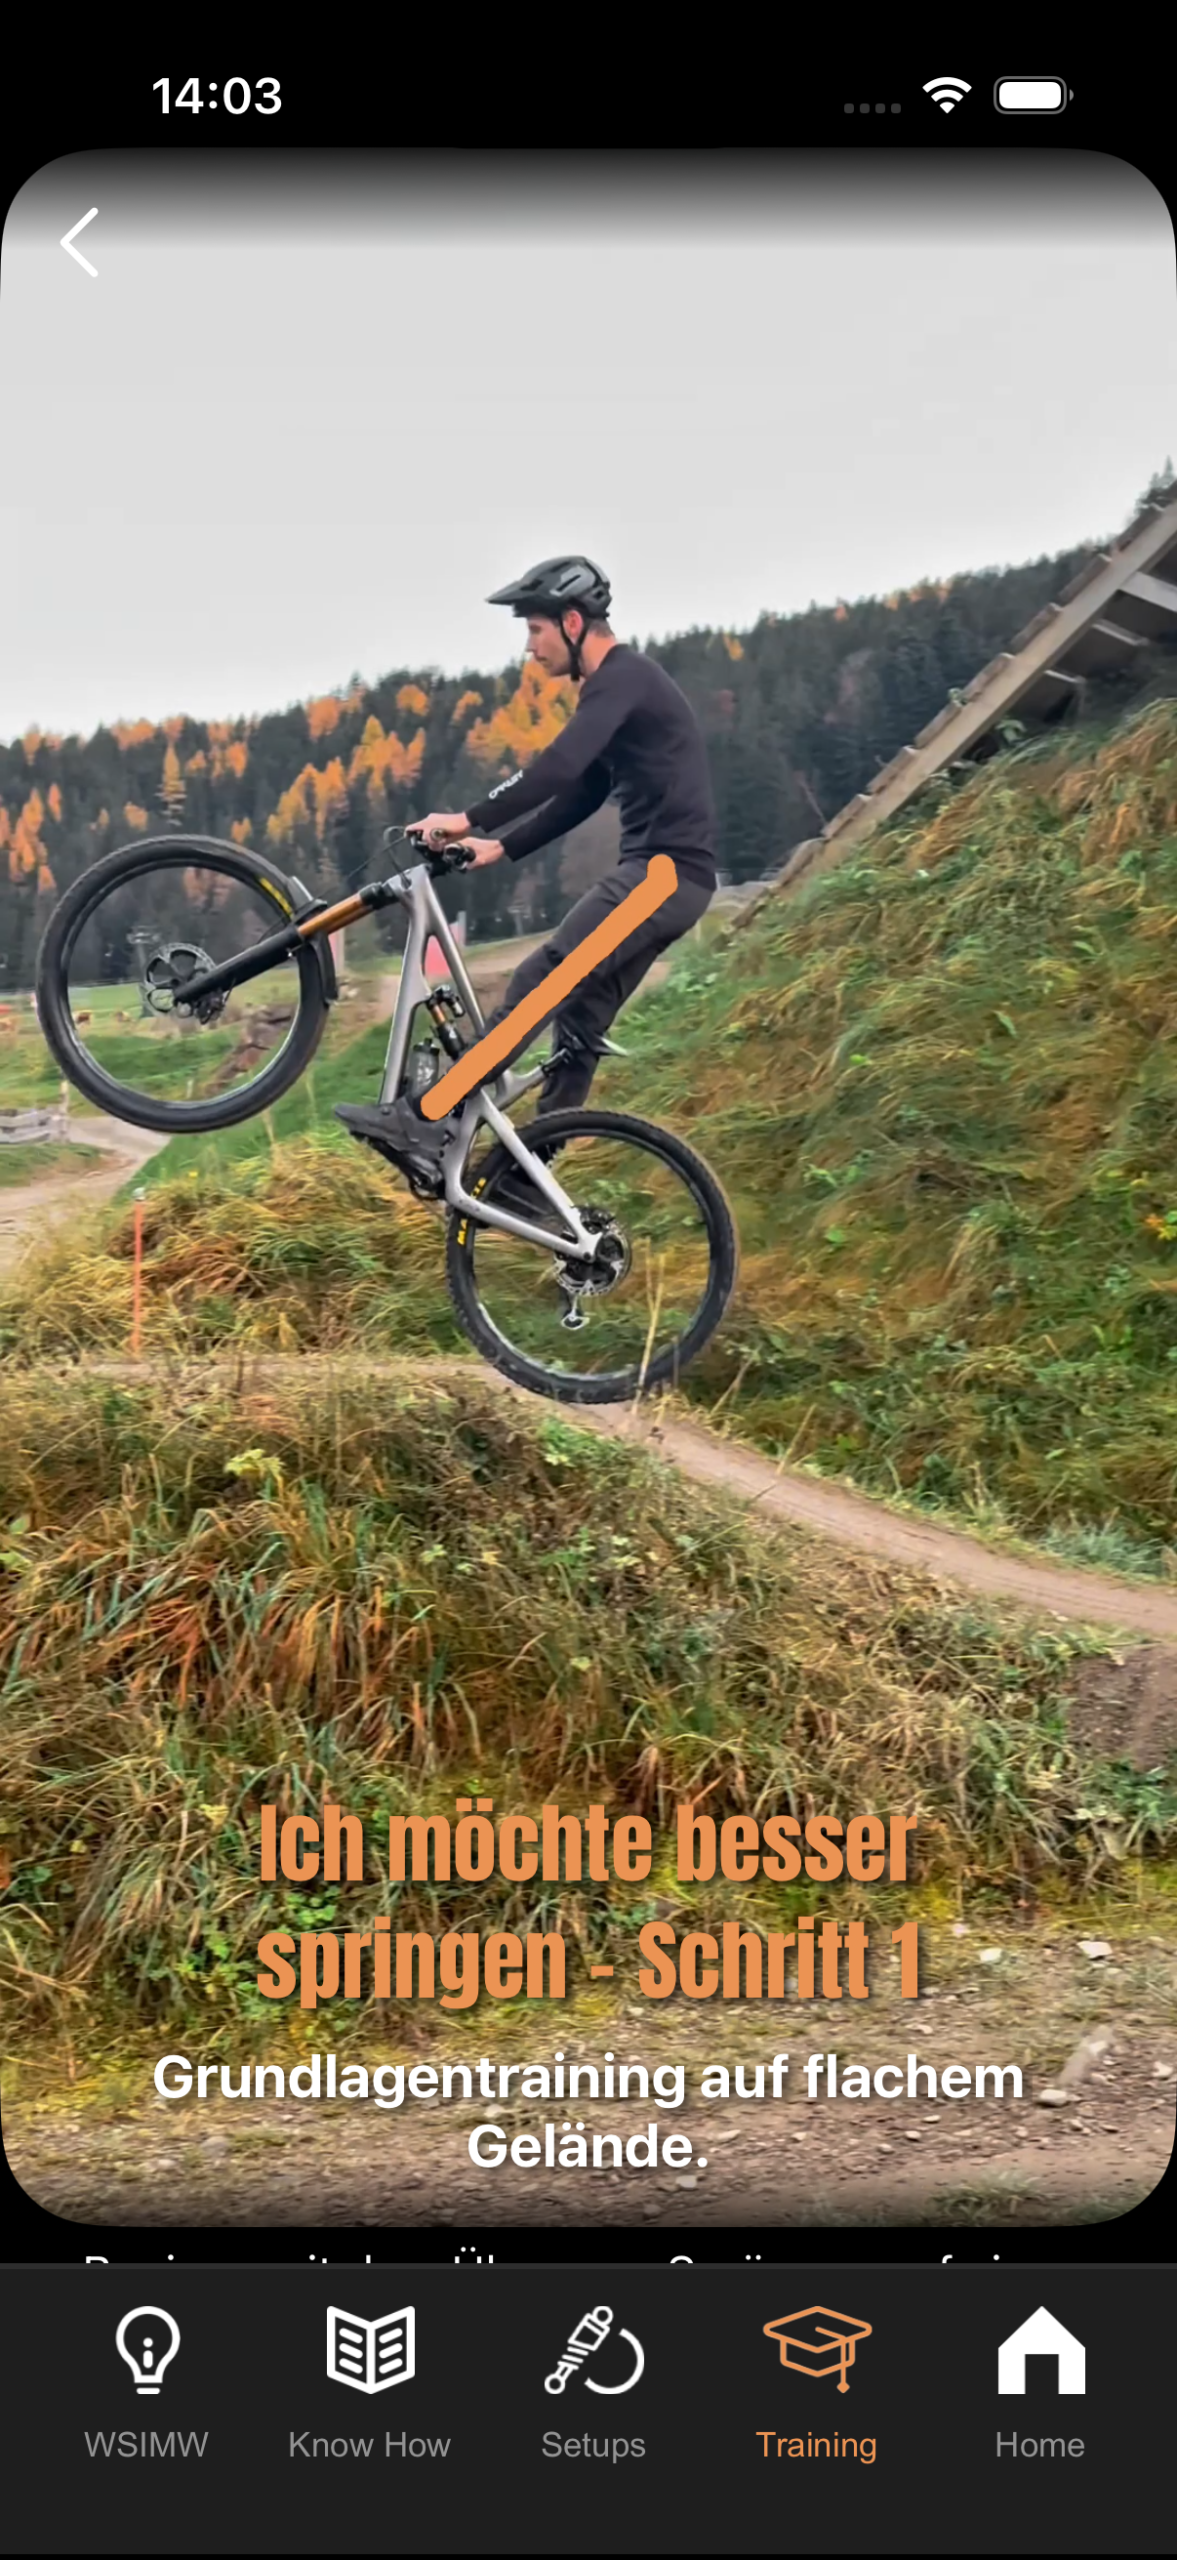
In the player, hold the video for slow motion. Swipe up for written instructions and the voiceover option. Follow the steps shown for that training; workouts and riding trainings have different lengths. Later steps and single-step access may require PRO+.
Bonus Video AI Check
Riding trainings offer a Bonus Video AI Check. Upload a clip of the relevant skill, no longer than 10 seconds; landscape format is recommended. Review the feedback, rating and medal, then use it to choose what to practise next. You can revisit completed riding training to repeat the video check.
Subscriptions and common questions
Manage your subscription through the store account used to purchase it.
How do I cancel?
On iPhone, open your Apple account’s Subscriptions settings and select SAGLY. On Android, open Google Play → Payments & subscriptions → Subscriptions and select SAGLY. Follow the store’s cancellation steps. Deleting the app does not cancel a subscription.
Why is a setting or recommendation missing?
Open the message beside the part or Tuning Score. Add requested details, confirm the exact installed component and check whether the feature needs an unlock. When reliable manufacturer data is unavailable, use your component documentation to enter a baseline manually.
Why has my test not advanced?
Check that you applied the recommendation, rode afterwards and used the assigned Strava bike. Finish the current test before starting a new one. Without Strava, use the offered reminder or continue controls after you have tested the setup.
So nutzt du SAGLY.
Finde das passende Setup für dein Bike.
Erstelle dein erstes Setup, verstehe deinen TUNING SCORE oder finde den nächsten Schritt für Wartung und Training.
Die Screenshots stehen direkt bei den passenden Schritten. Tippe auf ein Bild, um es zu vergrößern.
Auf dieser SeiteThema auswählen
Kein passendes Thema gefunden. Versuche „Setup“, „Score“ oder „Training“.
Spring direkt zum gewünschten Thema. Dein aktueller Abschnitt wird beim Lesen hervorgehoben.
Finde dich in SAGLY zurecht
Wechsle über die Navigation am unteren Bildschirmrand zwischen den Hauptbereichen der App.
- Home: Bearbeite dein Profil, erstelle ein Setup oder öffne SETUPS ENTDECKEN.
- Setups: Sieh dir deine Bike-Einstellungen an, bearbeite sie, öffne den TUNING SCORE, prüfe die Wartung und öffne die HISTORIE.
- WSIMW: Öffne die Anleitung zur Problemlösung „Was soll ich tun, wenn …?“.
- Know How: Lerne die Begriffe und Einstellungen deines Fahrwerks kennen.
- Training: Übe deine Fahrtechnik oder absolviere ein Workout.
Neu bei SAGLY? Beginne mit deinem Profil, erstelle ein Setup und nutze dann den TUNING SCORE, um deine nächsten Anpassungen anzugehen. Du hast schon ein Setup? Spring über das Inhaltsverzeichnis direkt zur gewünschten Funktion.
Ergänze dein Fahrerprofil
Deine Fahrerdaten helfen SAGLY, passende Startwerte vorzuschlagen.
Hier findest du den Profilstift auf Home ↑
- Öffne Home und tippe auf den Stift rechts neben deinen Fahrerdaten.
- Wähle dein Maßsystem: metrisch für Kilogramm und Zentimeter oder imperial für Pfund und Zoll.
- Trage deine Körpergröße und dein Körpergewicht ohne Bike-Ausrüstung ein und wähle deine Fahrerfahrung.
- Wähle bar oder PSI für den Reifendruck. Speichere dein Profil.
Du kannst auch Strava über dein Profil verbinden. Damit kannst du Fahrten importieren, die Wartung verfolgen und die Fahrten für Tests mit dem TUNING SCORE prüfen.
Erstelle ein Setup und identifiziere dein Bike
Öffne Home → NEUES SETUP ANLEGEN und wähle, wie du starten möchtest.
- ENTSPANNT: Erhalte mit weniger manuellen Schritten eine grob vorkonfigurierte Grundeinstellung.
- FORTGESCHRITTEN: Trage deine bereits verwendeten Einstellungen ein oder arbeite dich selbst durch die Setup-Guides.
- Füge einen Bike-Namen, deinen Fahrort und das Gelände hinzu. Mit einem Foto kannst du deine Setups leichter unterscheiden.
- Wähle deine Komponenten einzeln aus oder nutze KOMPLETTBIKE, um die Ausstattung deines Bikes zu importieren.
- Vergleiche die importierten Komponenten mit den tatsächlich verbauten Teilen. Bestätige bei Federgabel und Dämpfer das Modell, Baujahr und die genaue Variante. Ergänze den Federweg der Gabel und den Dämpferhub, wenn du danach gefragt wirst.
- Gehe die Einstellungen durch und schließe das Setup ab. Anschließend findest du es unter Setups.
Das Modelljahr deines Bikes stimmt nicht immer mit dem Baujahr der Federung überein. Prüfe auch nachgerüstete oder ausgetauschte Teile. Genaue Angaben helfen SAGLY, die passenden Setup-Daten auszuwählen.
Wenn du ein Teil noch nicht identifizieren kannst, wähle TEIL SPÄTER, sofern diese Option angeboten wird. Schließe den Rest ab und nutze anschließend „Angaben ergänzen“ oder prüfe das Teil unter Setups. Mit einer freien Modellbezeichnung kannst du deine Hardware erfassen; ein exakt auf das Modell abgestimmtes Setup ist damit aber möglicherweise nicht verfügbar.
Erstelle deine Grundeinstellung
Übernimm deine vorhandenen Einstellungen oder nutze einen Guide, um eine Basis für Reifen, Federgabel und Dämpfer zu finden.
Wähle den Guide, der zu deinem Ausgangspunkt passt
- Reifen: Nutze den LUFTDRUCK RECHNER und prüfe das Ergebnis mit deinen Reifen auf deinem Gelände.
- Federgabel und Dämpfer: Der EASY SETUP GUIDE bietet die SAG-Methode, das SAGLY KI- & HERSTELLER-SETUP sowie praktische Tests für Zug- und Druckstufe.
- Du hast schon Einstellungen? Erfasse sie manuell, damit du vor der ersten Änderung einen Vergleichswert hast.
Bestätige für das KI- und Hersteller-Setup die genaue Komponente und ergänze die angefragten Bike- und Fahrerdaten. Manche Ergebnisse erfordern weitere Angaben oder eine Prüfung der Hardware beziehungsweise OEM-Abstimmung. Wenn Herstellerdaten fehlen, kann SAGLY einzelne Einstellungen offenlassen. Diese kannst du stattdessen manuell eintragen.
Verstehe die ermittelten Werte als Ausgangspunkt, den du prüfen und testen solltest. Die Wahl des KI-Setups bedeutet nicht, dass jeder angezeigte Wert direkt aus einer Herstellertabelle stammt.
Verwalte und bearbeite deine Setups
Öffne Setups, um die gespeicherten Werte für dein Bike zu sehen. Wische zwischen deinen Setups oder nutze die Pfeile.
- IM EINSATZ markiert das Setup, das du gerade an deinem Bike verwendest.
- SCHNELL ÄNDERN lässt dich gespeicherte Werte direkt in der Setup-Ansicht anpassen. Beende die Bearbeitung, wenn du fertig bist.
- Im Optionsmenü findest du Gabel bearbeiten, Dämpfer bearbeiten, Reifen bearbeiten, Teile bearbeiten, Alles Bearbeiten, Kopieren und die Wartungsoptionen.
- Unter NOTIZEN kannst du Streckenbedingungen, Reifenwechsel oder Ideen für den nächsten Test festhalten.
- NÄSSE/REGEN zeigt Vorschläge für nasse Bedingungen.
- SETUP TEILEN öffnet die Optionen zum Teilen.
Kopiere ein Setup, bevor du eine andere Strecke, ein Rennen oder eine andere Reifenkombination ausprobierst, wenn du deine aktuelle Referenz behalten möchtest. Gib jeder Kopie einen eindeutigen Namen.
Verstehe deinen TUNING SCORE
Tippe auf den TUNING SCORE-Ring oder das entsprechende Feld über deinem Setup, um deinen Fortschritt und die nächsten Schritte zu sehen.
Der Prozentwert beschreibt, wie vollständig, getestet und abgestimmt dein Setup für dein Bike, dein Gelände und deinen Fahrstil ist. Er hilft dir bei der Abstimmung; er misst weder deine Geschwindigkeit noch die Sicherheit deines Bikes.
- BASELINE-KONVERGENZNähere dich einer modellspezifischen Grundeinstellung. Einige Änderungen an der Federung hängen zusammen und können mehrere Einstellungen gleichzeitig anpassen.
- CHECKLISTEN-TUNINGGehe fünf Prüfungen zum Fahrgefühl durch, um das Verhalten deines Bikes auf dich abzustimmen.
- AI-EMPFEHLUNGENPrüfe weitere Anpassungen anhand deiner Setup-Daten und bisherigen Tests.
Ist dein Setup unvollständig, nutze den Stift neben einer fehlenden Angabe oder tippe auf SETUP VERVOLLSTÄNDIGEN. Für Vorschläge zur Grundeinstellung können die genaue Federung, der Federweg, der SAG und weitere angefragte Angaben erforderlich sein.
NÄCHSTE BESTE ÄNDERUNGEN zeigt dir die vorgeschlagene Komponente und Anpassung. Empfehlungen in späteren Stufen können außerdem erklären, warum die Änderung helfen sollte. Die Verfügbarkeit hängt von deinen Setup-Daten und deinem App-Zugang ab; Empfehlungen können PRO oder PRO+ erfordern.
Du kannst den TUNING SCORE für ein Setup ausschalten oder ALS PERFEKT MARKIEREN wählen, wenn du zufrieden bist. Tippe auf SPEICHERN, um diese Einstellungen zu behalten. ALS PERFEKT MARKIEREN ist deine eigene Einschätzung. Mit MARKIERUNG ZURÜCK erhältst du wieder Vorschläge. Eine übersprungene Stufe gilt nicht als gemeistert und kann die Aussagekraft der Empfehlungen verringern.
Änderung umsetzen, fahren und Feedback geben
Ein sinnvoller Vergleich beginnt mit einer klaren Änderung und einer echten Fahrt.
- Öffne eine Empfehlung und lies die genauen Änderungen. Tippe auf ANWENDEN, um den vorgeschlagenen Test in SAGLY zu speichern.
- Setze die Änderungen an deinem Bike um. Lass andere Einstellungen unverändert, solange der Test läuft.
- Fahre mit dem neuen Setup. Wenn Strava verbunden ist, muss die Aktivität nach dem Anwenden der Änderung beginnen und dem für den Test ausgewählten Bike zugeordnet sein.
- Kehre zu SAGLY zurück, um fortzufahren. Bei der Grundeinstellung schaltet die Prüfung deiner Fahrt den nächsten Schritt oder die Checkliste frei. Spätere Tests fragen dich nach dem Fahrgefühl.
Wähle für den Vergleich „Viel besser“, „Etwas besser“, „Etwa gleich“ oder „Schlechter“. Wenn du noch nicht gefahren bist, wähle „Noch nicht getestet“. Ehrliches Feedback macht den nächsten Schritt hilfreicher.
Während ein Test läuft, pausieren neue Empfehlungen. Schließe den Test ab oder überspringe ihn, bevor du einen neuen beginnst – auch bei einem anderen Setup. Abgesehen von den zusammenhängenden Änderungen der Grundeinstellung solltest du jeweils eine gezielte Anpassung testen.
Nutze SAGLY ohne Strava
Wähle OHNE STRAVA ERINNERN, wenn du eine Stunde nach dem Anwenden einer Empfehlung an dein Feedback erinnert werden möchtest. Die Benachrichtigung ist eine optionale Erinnerung und bestätigt keine Fahrt. Gib dein Feedback erst, nachdem du das Bike getestet hast.
Für ein konkretes Problem auf dem Trail öffnest du WSIMW, wählst das passende Symptom und prüfst die Lösungsvorschläge. Wende einen passenden Vorschlag an, ändere die Einstellung am Bike und teste sie, bevor du eine weitere Anpassung hinzufügst.
Nutze die HISTORIE, um aus deinen Änderungen zu lernen
Scrolle in deinem Setup zu HISTORIE, um zu sehen, was sich wann geändert hat.
Einstellungsänderungen zeigen den bisherigen und den neuen Wert mit Datum und Uhrzeit. Dein Feedback steht direkt beim Tuning-Eintrag. So kannst du eine Anpassung mit deinem Fahrgefühl verbinden.
Importierte Strava-Fahrten und erledigte Wartungen können ebenfalls hier erscheinen. Nutze die Filter für Änderungen, Feedback, Fahrten oder Wartungseinträge. Prüfe vor dem nächsten Test die letzte Änderung und ergänze bei Bedarf eine Notiz zur Strecke oder zu den Bedingungen.
Verfolge Fahrten und Wartung mit Strava
Verbinde Strava in deinem Profil und lege dann für jedes Setup fest, wie es deine Fahrten nutzen soll.
Hier findest du „Wartung bearbeiten“ im Werkzeugmenü ↑
- Erstelle oder bearbeite das Setup und wähle „WARTUNG & STRAVA-FAHRTEN“. Wenn du nur Aktivitäten in der HISTORIE sehen möchtest, wähle „NUR STRAVA-FAHRTEN“. Über die Setup-Optionen kannst du auch „Wartung bearbeiten“ öffnen.
- Wähle die Strava-Bikes aus, die zu diesem Setup gehören, und lege das Startdatum für den Import fest. Ohne ausgewählte Bikes werden keine Fahrten importiert.
- Wähle für die Wartungsverfolgung Fahrstunden oder Strecke und aktiviere die benötigten Aufgaben und Intervalle. FÜGE STANDARD INTERVALLE EIN bietet einen Ausgangspunkt. Passe die Intervalle an die Vorgaben deiner Komponentenhersteller an.
- Prüfe die Fortschrittsbalken unter Setups. Öffne nach einer tatsächlich durchgeführten Wartung die entsprechende Aufgabe und nutze WARTUNG ZURÜCKSETZEN, um sie zu erfassen.
Beim Filtern nach Bike werden nur passende Fahrten importiert. Fehlt eine Aktivität, prüfe das ihr in Strava zugeordnete Bike. Bereits importierte Fahrzeiten oder Strecken können die Wartungsbalken direkt nach dem Einrichten teilweise füllen. Prüfe daher das Import-Startdatum und deine tatsächlich durchgeführten Wartungen.
Verstehe die Einstellungen und entdecke andere Setups
Nutze Know How für Erklärungen und SETUPS ENTDECKEN für Ideen anderer Fahrer.
Hier findest du SETUPS ENTDECKEN und Know How auf Home ↑
Öffne Know How über die untere Navigation, um Begriffe und die Wirkung von Anpassungen zu verstehen. Die Erklärungen „Was ist …?“ in den Setup-Guides helfen dir direkt bei der jeweiligen Einstellung.
Öffne auf Home den Bereich SETUPS ENTDECKEN. Suche oder filtere nach Rahmen, Federgabel, Dämpfer oder Reifenmodell und vergleiche die Fahrer- und Bike-Daten. Du kannst ein Setup mit einem High-Five markieren, kommentieren oder in deine eigenen Setups kopieren.
Prüfe ein kopiertes Setup als Referenz und passe es dann an deine Komponenten, dein Körpergewicht und deine Fahrbedingungen an. Ein gleicher Gabelname allein macht die Einstellungen eines anderen Fahrers noch nicht direkt passend für dein Bike.
Übe mit Training und dem Video-KI-Check
Öffne Training und tippe auf das Plus, um die gewünschte Trainingsart auszuwählen.
- Trainingsplan erstellen: Wähle bis zu drei Ziele und lege passende Tage und eine Häufigkeit für deine Woche fest. Bike-Pläne berücksichtigen deine Wetterwünsche. Bei Workout-Plänen kannst du, sofern angeboten, die Dauer sowie das Training zu Hause oder im Fitnessstudio wählen.
- Training erstellen: Absolviere ein Training ohne Kalenderplan.
- Einen Trainingsschritt machen: Wähle BIKE oder WORKOUT, ein Training und den gewünschten Schritt. Tippe anschließend auf SCHRITT STARTEN. Dein bestehender Plan bleibt dabei unverändert.
Im Kalender siehst du geplante Einheiten. Die Bereiche für heutige, kommende und abgeschlossene Trainings helfen dir, die nächste Einheit zu finden oder frühere Trainings erneut zu öffnen. Abgeschlossene Einzelschritte haben eine eigene Historie.
Halte im Player das Video gedrückt, um es in Zeitlupe abzuspielen. Wische nach oben für die schriftliche Anleitung und die Vorlesefunktion. Folge den angezeigten Schritten. Workouts und Bike-Trainings können unterschiedlich lang sein. Spätere Schritte und einzelne Trainingsschritte können PRO+ erfordern.
Bonus: Video-KI-Check
Bike-Trainings bieten einen zusätzlichen Video-KI-Check. Lade einen Clip der entsprechenden Fahrtechnik mit maximal 10 Sekunden Länge hoch; empfohlen wird das Querformat. Prüfe Feedback, Bewertung und Medaille und entscheide damit, was du als Nächstes üben möchtest. Du kannst ein abgeschlossenes Bike-Training erneut öffnen und den Video-Check wiederholen.
Abonnements und häufige Fragen
Verwalte dein Abonnement über das Store-Konto, mit dem du es gekauft hast.
Wie kündige ich mein Abo?
Öffne auf dem iPhone die Abonnements in den Einstellungen deines Apple-Kontos und wähle SAGLY. Öffne unter Android Google Play → Zahlungen und Abos → Abos und wähle SAGLY. Folge den Kündigungsschritten des Stores. Das Löschen der App kündigt kein Abonnement.
Warum fehlt eine Einstellung oder Empfehlung?
Öffne den Hinweis neben der Komponente oder beim TUNING SCORE. Ergänze die angefragten Daten, bestätige die genaue verbaute Komponente und prüfe, ob die Funktion freigeschaltet werden muss. Fehlen verlässliche Herstellerdaten, trage anhand deiner Komponentenunterlagen selbst eine Grundeinstellung ein.
Warum geht mein Test nicht weiter?
Prüfe, ob du die Empfehlung angewendet hast, danach gefahren bist und das zugewiesene Strava-Bike verwendet hast. Schließe den aktuellen Test ab, bevor du einen neuen beginnst. Ohne Strava nutzt du nach der Testfahrt die angebotene Erinnerung oder die Schaltflächen zum Fortfahren.