HOW TO USE SAGLY …
Step 1) EDIT PROFILE
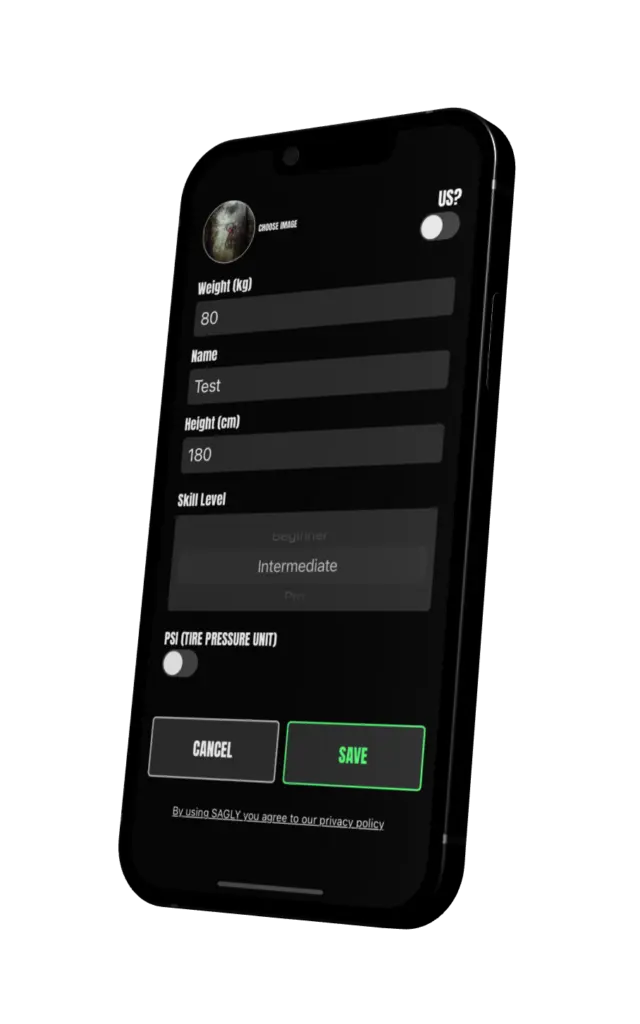
In order to get the right SMART SUGGESTIONS for your mountain-bike suspension, you should create your profile first.
You can edit your profile when tabbing on the small pencil next to profile image in the menu view.
On the top left you can add a profile picture.
Then you can choose between
American units of measurement (Pound and Foot) or Imperial units of measurement (Centimetres and Kilogram).
Based on this settings you can add your body height and body weight (With riding gear ideally).
Then you can add how skilled you are when it comes to riding mountain-bikes.
Moreover you can choose if you want to use Bar or PSI as your measurement for tire pressure.
Step 2) CREATE SETUP
Attention: Count clicks always from fully closed clockwise when creating a new setup.
You can create a new setup when tabbing on the CREATE NEW SETUP text in the menu section.
Here you can either create a setup without help.
When you do that you usually have already a setup on your mountain-bike with a fitting SAG and you just want to input the values of the settings of each part of your mountain-bike suspension.
The first screen will ask you for information how you want to name the setup.
It also asks you where you ride your setup (Location) and which terrain you ride your setup (Enduro or Bikepark).
Optionally you can also add a cool picture of your bike or of yourself riding your mountain-bike.
You can go back at the bottom left to previous screens or go to the next screen when tabbing NEXT in the bottom right of the screen.
Choose your part models
Then you can choose the models of the parts you have on your mountain-bike suspension when tabbing on NEXT.
You can select a part: E.g.: FORK and then chose the model on the next screen.
Here you just input, which brand name, year the model was built, and the model name.
It also suggests you models, which you can simply pick in the dropdown.
In this way it easier for you to compare your setup with other riders in the EXPLORE SETUPS … feature.
Read more about this feature below.
Of course you can add individual input too, if you cannot find your model.
After that you just go through the three parts in the CREATE NEW SETUP section and state your clicks, pressure etc. for the specific setting.
At the end of the CREATE NEW SETUP wizard you receive a hint whether your setup is balanced or not.
Further information will show up in the actual BALANCE view about how to balance your setup.
When you tab on finish your new setup will be created and you will be forwarded to the setup in the MANAGE SETUPS section.
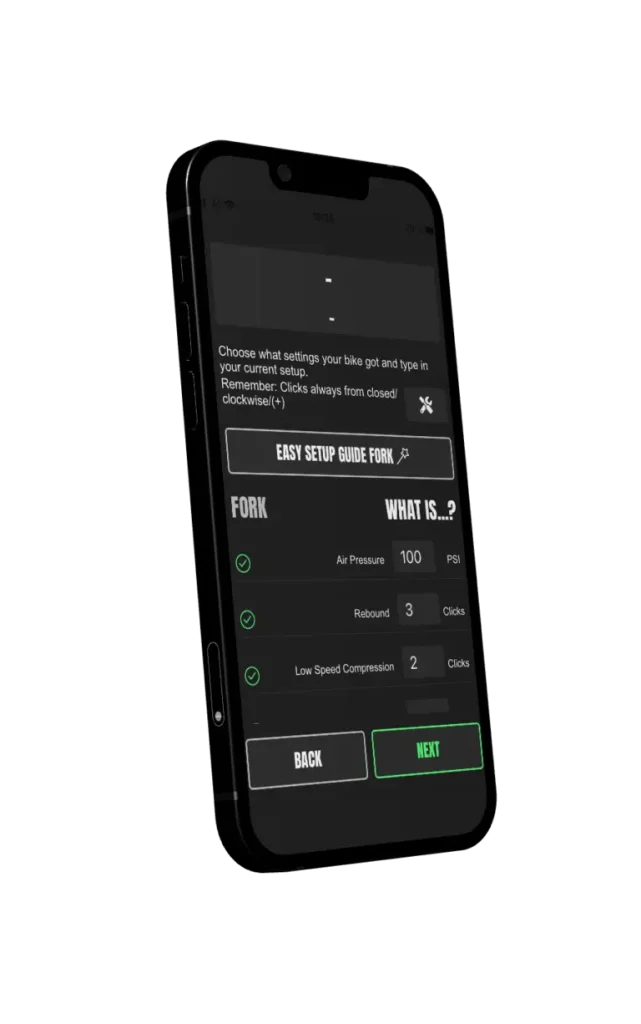
The EASY SETUP GUIDE
What you can also use, when creating a new setup, is the EASY SETUP GUIDE for each part: Tires, Fork and shock.
It guides you through the setup of your mountain-bike suspension and gives you also SMART SUGGESTIONS for the tire pressure.
You should use the EASY SETUP GUIDE, if you want to adjust your suspension from the ground up.
The EASY SETUP GUIDE is for each part different. For the tires it give you a suggestion for the tire pressure based on your weight.
You find this functionality in the tire part view when tabbing on the AIR PRESSURE CALCULATOR button, which you find in the upper part of the screen.
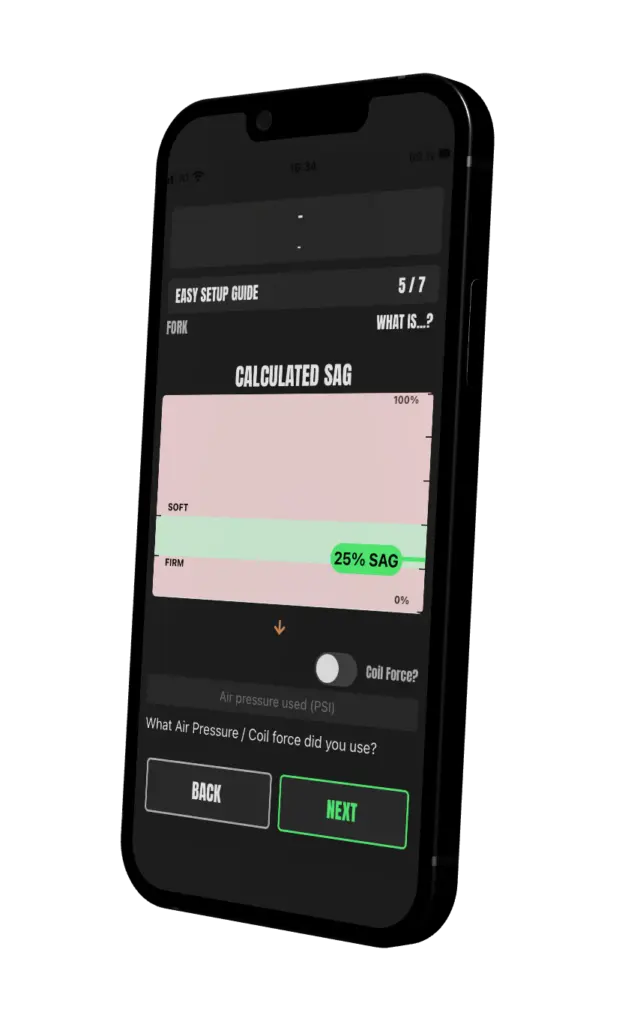
For the Fork and Shock it gives you a SAG guide when tabbing on the EASY SETUP GUIDE button.
You can find this button as well in the upper part of the screen.
This guide helps you to create a good base setup and starting point for the settings air pressure, coil force and rebound.
Those are the most important settings. If you have those right you have a good base setup.
What SAG means and how to measure it, is explained in the EASY SETUP GUIDE screens.
The WHAT IS text in the upper right part of the screens gives you some explanation of the specific setting.
What e.g. rebound is for, and what effect minus or plus clicks have.
Step 3) MANAGE YOUR SETUPS
After you created a new setup you will be linked to the MANAGE SETUPS screens.
You can also choose this section when you tab on the MANAGE SETUPS text in the menu.
In the MANAGE SETUPS view you can, as the name says it already, manage your setups.
By swiping to the side you can switch between your setups.
You can also use the arrows in the top section to switch between setups.
Then you tab on IN USE to mark the shown setup as the setup you are using at the moment on your bike.
The setup is now shown in green.
Moreover you can click on RAIN to see what values SAGLY suggests you when you ride your mountain-bike in wet conditions.
Then you can also edit your settings.
You can make slight changes on your setup whenever you feel like it.
Just tab after you chose QUICK EDIT on the setting you want to change and then choose another value with your keyboard and then tab on save.
You can also add notes to your setup which you want to remember in regard of the shown setup.
Here you can tab on EDIT NOTE above the note field, add text to the field and then tab on save.
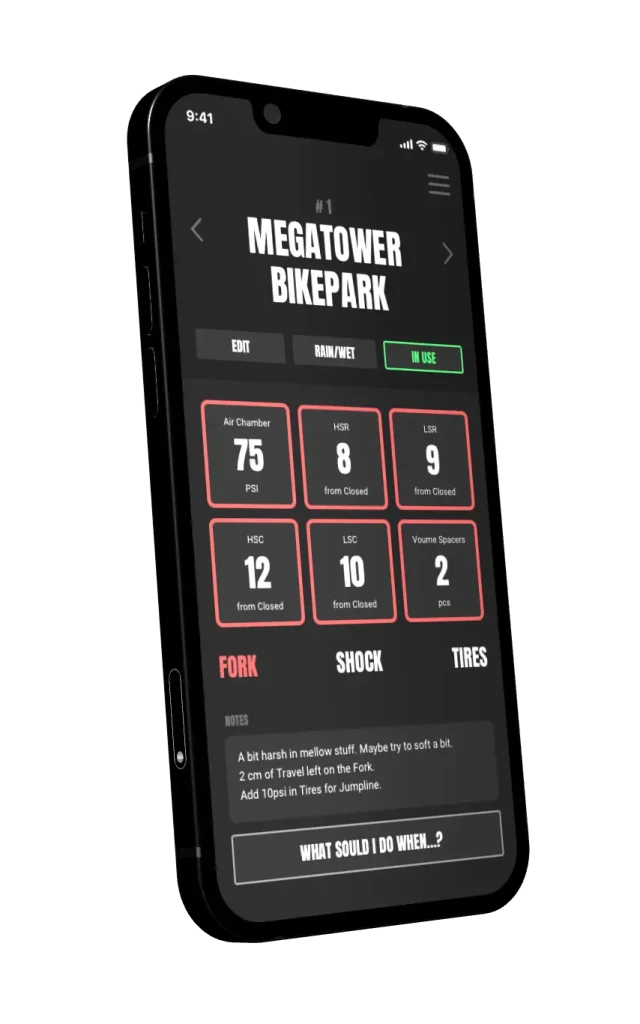
The lower part of the MANAGE SETUPS view.
The tiles are simply the settings you added when creating your setup.
At the top you can also see you mountain-bike image you chose when creating a new setup.
At the bottom you can see an arrow with rainbow colors.
Tabbing on this arrow allows you SHARE your setup on social media, like Instagram, Facebook or send the setup via E-Mail to a friend.
If you tab at the top right on the three dots, you will see a sub menu.
In this menu you can choose EDIT ALL, which let you edit your whole setup again with the same screens like when you did the CREATE NEW SETUP step.
When you went through all the screens your edits will be saved and you will be linked back the respective setup in the MANAGE SETUPS view.
Then you can COPY the setup Here you can make a copy of your current setup.
You will be forwarded to the CREATE NEW SETUP screens where you can make changes if you want.
When you are done with all the screens your copy will be saved and you will be forwarded back the respective setup in the MANAGE SETUPS view.
Moreover you can DELETE the setup and as the name says this action is removing the setup.
The HISTORY feature
Moreover at bottom you can see who HIGH-FIVED or commented your setup.
You can also add comments to other users comments.
Other users will be notified and can react on you comments.
Lastly the HISTORY helps to to keep track of your changes.
The latest changes are on the top and the oldest changes in the bottom.
A time and date stamp helps you identify, when you made the changes.
The two values in row show the previous value the setting had and the new value the setting has now.
In addition the feeling you add in the feedback loop is also shown here.
This helps you to see how you felt, after changes you have made on your setup.
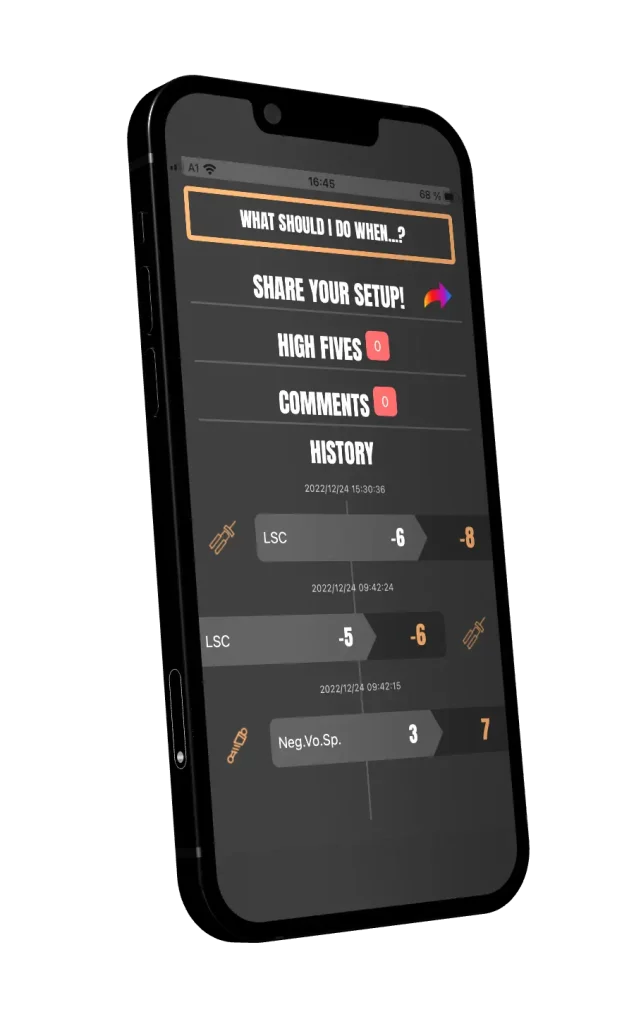
These are three different icons, which mark your added feedback about your feeling.
Each icon stands for a category, which helps you classify the kind of feeling you had easily.

This marks a negative feeling. You felt bad about the changes and the setting still needs some work.

This marks a neutral feeling. You added custom changes and feedback does not indicate any direction towards good or bad.

This marks a positive feeling. You felt good about the changes and the setting is adjusted well.
The WHAT SHOULD I DO, WHEN button helps you to continuously improve your setup. More about this feature in the next paragraph.
Step 4) Tune your mountain-bike suspension
1 CLICK CLOSED (- | CW) means turn the specific setting one time clock-wise until you hear a click.
1 CLICK OPEN (+ | CCW) means turn the setting the opposite direction: counter-clock-wise.
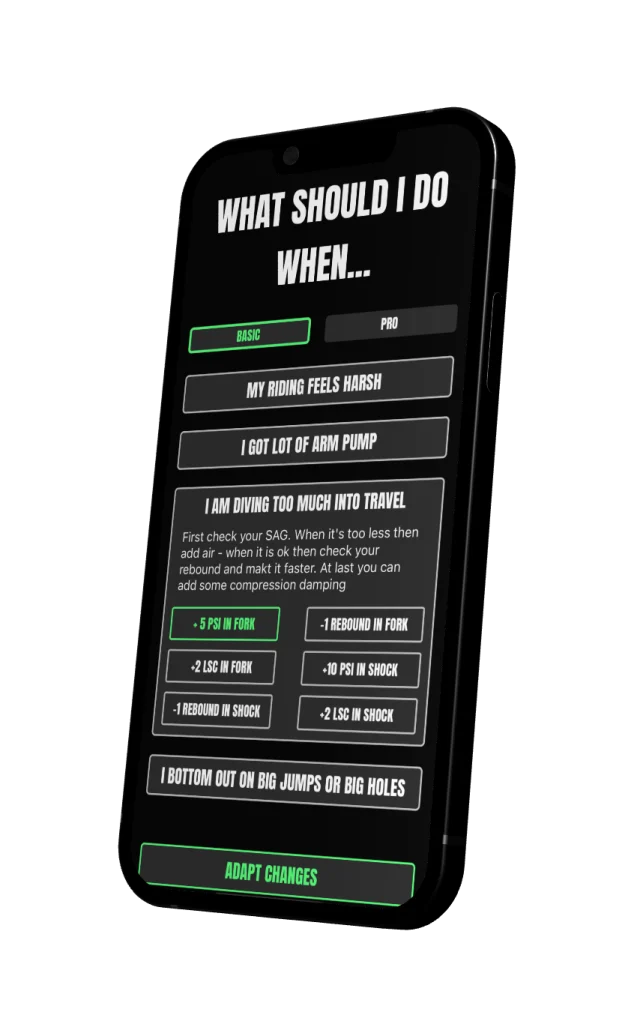
WHAT SHOULD I DO, WHEN … guide
When tabbing on the WHAT SHOULD I DO, WHEN … button, you can find many problems you maybe face when riding your mountain-bike suspension.
You can choose between PRO problems and INTERMEDIATE problems in the toggle at the top right area of this screen.
When you expand a problem by tabbing on it, you see solutions for this specific problem.
You can choose a solution. Then the solution is marked green.
If you tab then on ADAPT CHANGES this changes will be applied to your SETUP.
You then can also make those changes on your real bike and try out if your problem with the suspension is solved.
We recommend only do apply one solution and then go riding and try it out.
Therefore you can keep track of your changes and you can feel better what effect this one change has on your mountain-bike.
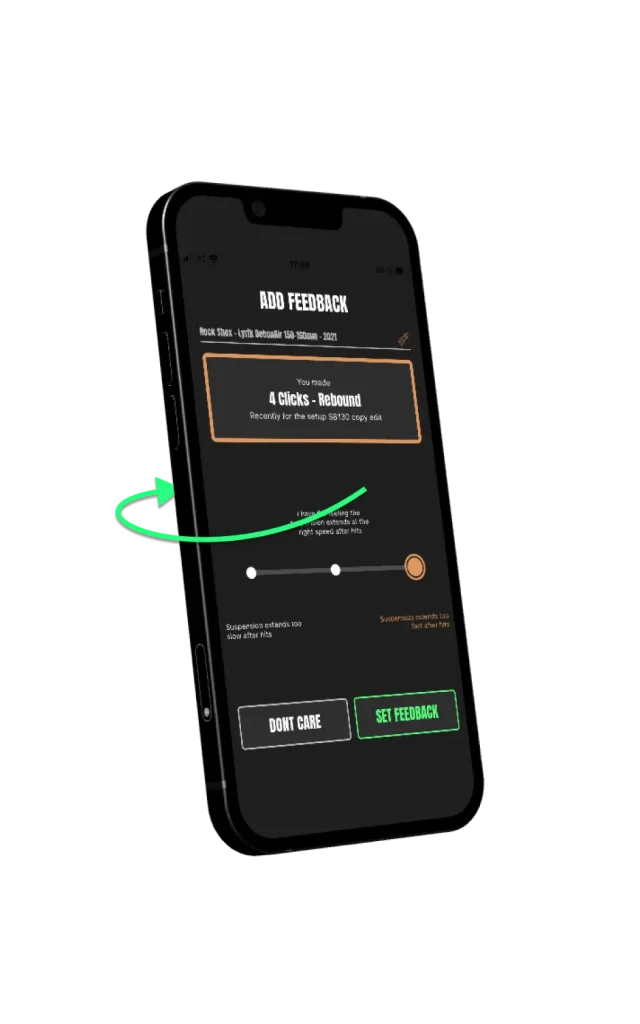
FEEDBACK LOOP VIA PUSH NOTIFICATIONS
Anytime you apply changes on your setup, SAGLY will get back to after 1 hour with a push notification and will ask you how you are feeling about the applied changes.
Based on your feeling new suggestions will be provided. Thus you are basically in an improvement-cycle and mimics in some way the
bracketing method, which is also used by World Cup riders.
You can also add custom feedback, if you want to add an individual feeling, you cannot find in the selection.
As mentioned above in the HISTORY feature, all the feedback you add to SAGLY is shown in the HISTORY feature under the respective adjustment of the setting.
This is a really neat feature, which will help you to find your “perfect” setup.
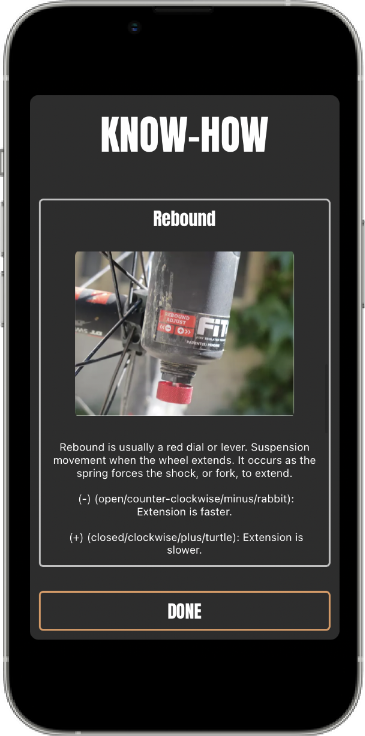
KNOW-HOW for your mountain bike suspension
Always visit the KNOW-HOW section in the menu, if you do not understand a term, you want to learn more about setting up your bike or you want to see the effects of changes on a specific setting.
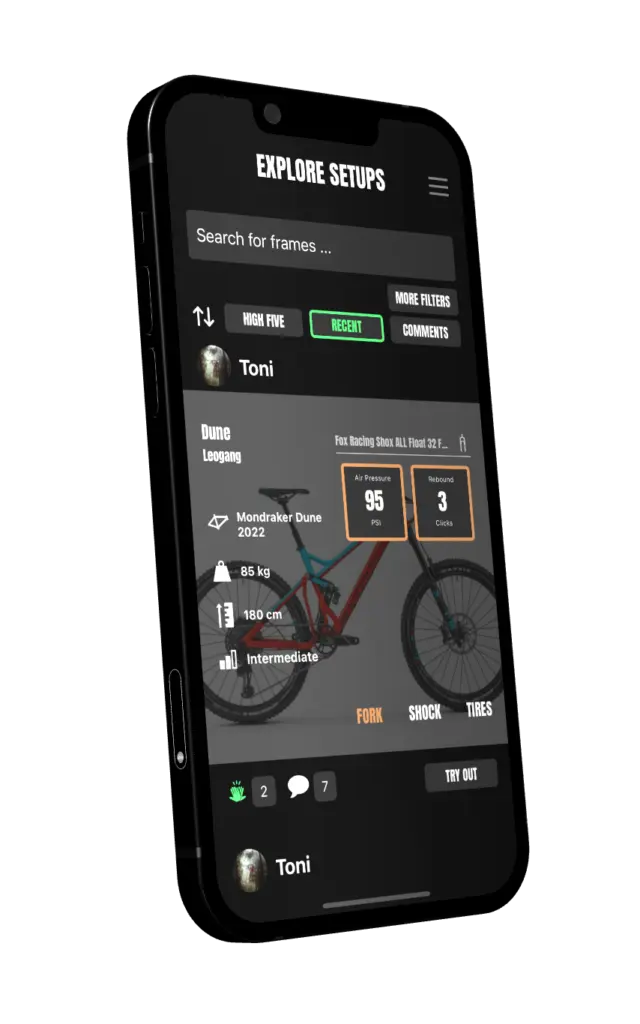
EXPLORE SETUPS from other riders
Explore mountain-bike suspension setups from other riders in the MTB settings app SAGLY.
Filter and Search by frame, fork, shock or tire-models.
Sort by number of high-fives (likes), number of comments, and recently created.
The setups of other riders are displayed with all information about the rider and the bike (suspension setup).
You can high-five (like) those setups, create comments or even try those setups out and copy them to your setups.

Maintain your mountain bike with SAGLY
SAGLY helps you also to maintain your mountain bike. Simply connect SAGLY to your Strava account in the EDIT PROFILE view.
The you can set up maintenance intervals when creating new setups or edit existing setups with the EDIT all feature in the MANAGE setups view.
Once you have set up the maintenance intervals, selected your Strava bikes or starting date time you want filter the Strava import,
you can inspect the progress of the respective maintenance in the MANAGE SETUPS view.
Once a progress bar of a maintenance is fully filled, reset them by selecting the maintenance. You should also execute the maintenance in real life.
There is a small explanation in the reset maintenance screen what you should do.
In the HISTORY you can keep track of your maintenance, which maintenance you have done and when you have done it.
Also your Strava rides are shown in the HISTORY feature. So a very helpful feature as well for your mountain-bike suspension.
SAGLY TRAINING
You want to become a better rider? With SAGLY TRAINING you many different mountain bike trainings in your pocket.
Create a custom training plan based on your needs and goals. Always get reminders on upcoming trainings and have an overview in the calendar.
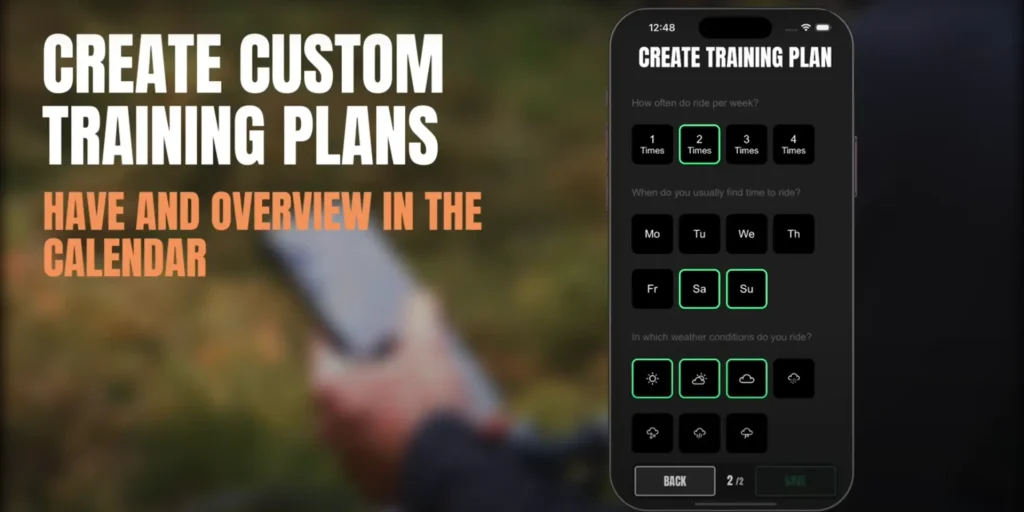
You can simply create a training or a training with a plan by using the button in the bottom right corner with the plus sign.
You will be forwarded to a wizard where you can selecte the trainings you want to execute.
You can select maximum 3 trainings at once.
Each training has a specific goal and helps to improve your riding in a specific area.
In case you create a training with trainings-plan there will be a second screen where you can select your riding preferences to personalize the riding or training plan to your needs.
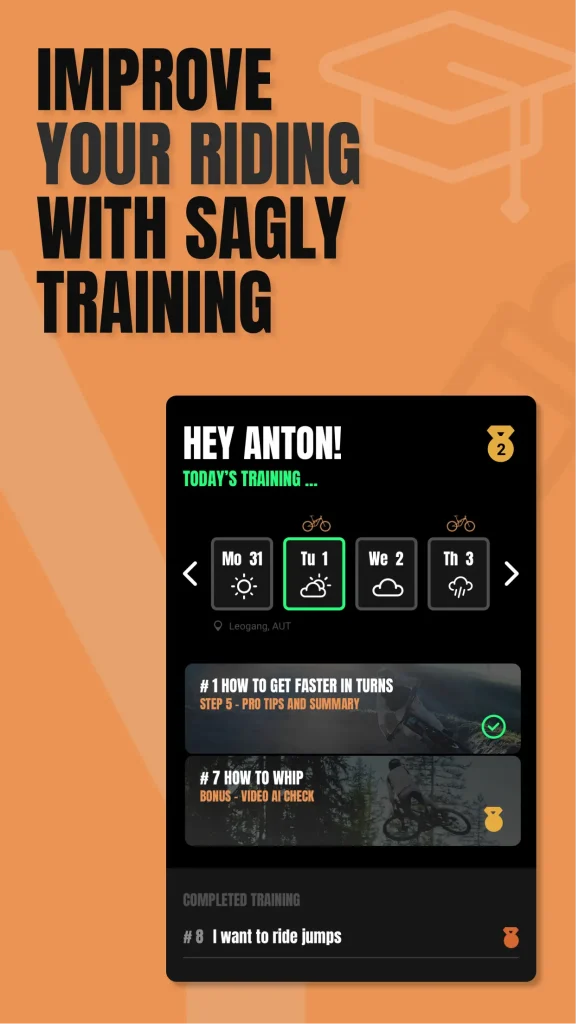
Have an overview with a calendar and a structured display of todays, upcoming, and completed trainings.
The calendar on the top of the screen will help you to see when the next upcoming training will take place.
Also the weather is displayed based on your current location.
A little bit lower you see what trainings you should do today or what trainings are upcoming.
By selecting the small play icon in the bottom left of the training you start the training.
Below these training you can see completed trainings.
Completed trainings are trainings where you have finished all 6 training steps.
You also can see which medal you won.
If you select the completed training you can repeat the AI Video check, which always is step 6.
The video player
After you have started the training, you are forwarded to the video player.
In the video player you can watch the training video, select slow-motion when tabbing on the video for a longer period.
Moreover by swiping up, you can read about the training setup and also you can play the text, in case you prefer to listen.


Step 6 – The AI VIDEO CHECK
When finishing step 5 in the training the next step will be to do the AI VIDEO CHECK.
You can upload a video of you riding or training the specific type of riding and you will get feedback by an AI system.
This feedback should help you to keep improving your riding technique. Any who knows, maybe you will win a medal?!
How to cancel my subscription?
You must cancel your subscription via the Apple App Store or Google Play Store.
You can find a manual how to do it for the
Google Play Store here
and for the
Apple App Store here.